
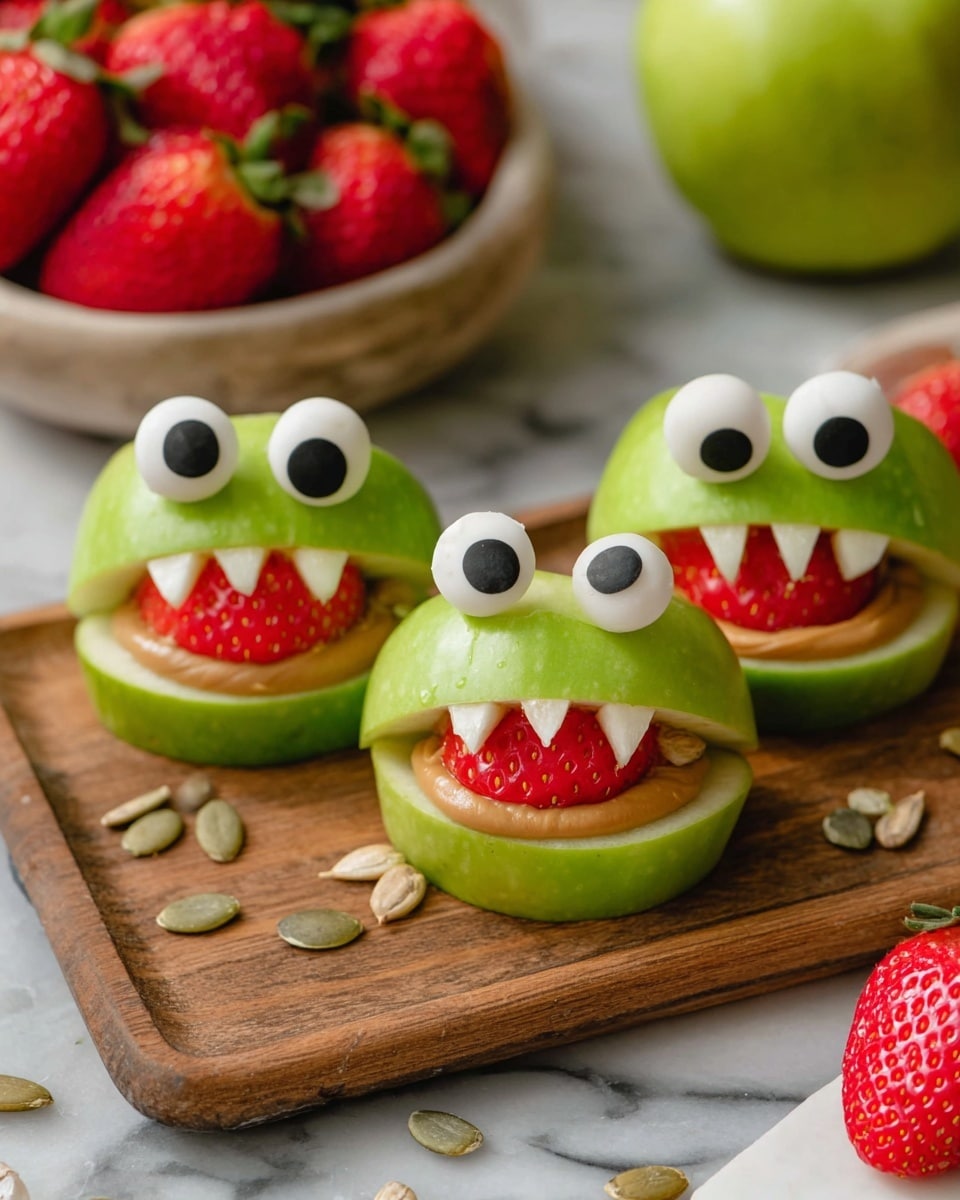
If you’re on the hunt for a quick, fun, and irresistibly cute Halloween treat, you have to try this Halloween Apple Monster Mouths Recipe. It’s one of those snacks that looks super impressive but takes hardly any time to whip up. Plus, the combination of crisp apples, creamy peanut butter, and those little “monster teeth” is just downright addictive. Trust me, once you make these, your spooky snack table won’t be the same!
Why You’ll Love This Recipe
- Quick & Easy: You can have these spooky snacks ready in just 15 minutes — perfect for last-minute parties.
- Kid-Friendly Fun: My kids love helping pop in the “teeth,” making it a great interactive activity.
- Healthy Meets Halloween: Packed with fresh apples and protein-rich peanut butter — a treat that feels less guilty.
- Super Customizable: Swap out candy corn for almond slivers or marshmallows to suit your family’s taste or dietary needs.

Ingredients You’ll Need
These ingredients are simple, familiar, and easy to find — and they work like magic when brought together. Using fresh, crisp apples really makes a difference, so pick your favorites!
- Apples: Go for firm, crisp varieties like Honeycrisp or Granny Smith for that perfect crunch and tartness.
- Creamy Peanut Butter: Creamy spreads better, making it easier to “glue” the apple slices together.
- Mini Marshmallows, Candy Corn, or Almond Slivers: These are your “monster teeth” – pick whichever option your family prefers.
- Sprite or Lemon Juice: These keep those apple slices from turning brown after slicing — it’s a simple but crucial step.
- Candy Eyes: These add personality and creepy charm to your monster mouths, making them extra fun.
Variations
I love how flexible the Halloween Apple Monster Mouths Recipe can be. Whether you’re tweaking it for allergies, taste preferences, or just for fun, it’s easy to make it your own.
- Nut-Free Version: I once swapped peanut butter for sunflower seed butter when friends came over with nut allergies — it was just as yummy and safe.
- Vegan Treat: Use almond butter and vegan-friendly mini marshmallows to keep it plant-based without compromising flavor.
- Spooky Colors: Try using green or red apples for a different look; green gives that classic monster vibe I adore.
- Alternative “Teeth”: Instead of candy corn, I sometimes use cashew halves or pretzel sticks for a salty twist that everyone loves.
How to Make Halloween Apple Monster Mouths Recipe
Step 1: Prep Your Apples Like a Pro
Start by removing the core from your apples — I highly recommend using an apple slicer if you have one because it makes evenly sized slices a breeze. Then, dip each slice into a bowl of lemon juice or even Sprite to keep them looking fresh and crisp without any browning. This little trick is something I discovered when making this recipe for the first time — it made a huge difference!
Step 2: Stick ‘Em Together with Peanut Butter
Spread a generous layer of creamy peanut butter on one side of an apple slice. Now, press another slice on top, peanut butter side down, so they stick together like a mouth. If you find the peanut butter a little too soft or the slices don’t hold well, toothpicks can be your best friend here for extra security — especially if little hands will be grabbing them.
Step 3: Add the Monster Teeth and Eyes
Here’s the fun part! Stick mini marshmallows, candy corn, or almond slivers right into the peanut butter between the apple slices to make jagged, spooky teeth. Once the mouth is equipped with fangs, add candy eyes on top for that perfect monster effect. I like to press the eyes gently into the apple skin so they stay put without any extra glue or frosting.
Pro Tips for Making Halloween Apple Monster Mouths Recipe
- Choose Firm Apples: I learned the hard way that softer apples get soggy quickly, so sticking to crunchier varieties makes a huge difference.
- Keep Peanut Butter Cool: If your peanut butter is too runny, pop the jar in the fridge for 10 minutes before using—it spreads and holds better that way.
- Work Quickly: Apples brown fast even with lemon juice, so assemble the monster mouths soon after dipping to keep them looking their best.
- Hide Toothpicks Well: If you use toothpicks, push them all the way through the apple slices so they’re hidden and safe for little ones to eat around.
How to Serve Halloween Apple Monster Mouths Recipe
Garnishes
I love adding a sprinkle of cinnamon on the peanut butter before putting the slices together for a little extra warmth and spice — it smells amazing and adds a fun twist. You can also toss on some festive sprinkles or edible glitter if you’re making these for a party and want to amp up the spooky vibes.
Side Dishes
These monster mouths are awesome on their own, but I like pairing them with a small bowl of yogurt or ranch dip for dunking, especially for the kids. They also go great alongside a vibrant veggie platter or even some popcorn for a full spooky snack spread.
Creative Ways to Present
At last year’s Halloween party, I laid these monster mouths out on a platter lined with faux cobwebs and added plastic spiders crawling between them — it was a hit! Another fun idea is to serve them on skewers so guests can grab monster mouth pops, or arrange them on a platter with a “monster-themed” backdrop for an easy selfie station.
Make Ahead and Storage
Storing Leftovers
I found that storing these in an airtight container lined with a damp paper towel helps keep the apples from drying out too much. Pop them in the fridge, and they’ll stay fresh for up to a day. Beyond that, the apples tend to soften and brown, so I recommend making just what you’ll eat or sharing them quickly.
Freezing
I’ve never frozen the complete monster mouths because the apples get mushy when thawed, but you can freeze apple slices separately if you want to prep ahead. Just remember to dip them in lemon juice right after slicing, freeze on a tray, and store in a freezer bag. Assemble the monster mouths fresh on the day you serve.
Reheating
Since this is best served fresh and cold, reheating isn’t needed. If you want, warm the peanut butter a bit to make it more spreadable when prepping, but once made, the monster mouths shine chilled — perfect for a refreshing and crunchy bite.
FAQs
-
Can I use other nut butter instead of peanut butter in the Halloween Apple Monster Mouths Recipe?
Absolutely! Almond butter, cashew butter, or sunflower seed butter all work well as alternatives, especially if you’re allergic to peanuts or prefer different flavors. Just make sure the nut butter is creamy so it spreads and sticks easily between the apple slices.
-
How can I keep the apple slices from browning longer?
Dipping the apple slices in lemon juice or a carbonated drink like Sprite right after slicing is key. The acid in lemon juice slows down oxidation, while the carbonation in Sprite also helps keep apples fresh and gives a slight zing. Work quickly to assemble after dipping for best results.
-
What are some fun “teeth” alternatives for picky eaters?
If kids aren’t fans of marshmallows or candy corn, try sliced almonds for a crunchier tooth, pretzel sticks for a salty bite, or even small cut pieces of cheese sticks. These all create that monster mouth effect while catering to different tastes.
-
Can I prepare these Halloween Apple Monster Mouths Recipe ahead of time?
Yes, but only a few hours in advance. Since apples tend to brown and get softer over time, it’s best to prepare and serve them the same day. Store in an airtight container in the fridge to keep them fresher if you need to prepare shortly before serving.
Final Thoughts
I absolutely love how this Halloween Apple Monster Mouths Recipe brings a playful, hands-on element to snack time — it’s as fun to make as it is to eat! When I first tried it, my family went crazy for those silly monster faces that also packed a refreshing crunch and satisfying peanut butter flavor. If you want a Halloween snack that’s easy, festive, and actually wholesome, I highly recommend giving this a try. You’ll be whipping up monster mouths again and again, trust me!
Print
Halloween Apple Monster Mouths Recipe
- Prep Time: 15 minutes
- Cook Time: 0 minutes
- Total Time: 15 minutes
- Yield: 6 monster mouths
- Category: Snack
- Method: No-Cook
- Cuisine: American
- Diet: Vegetarian
Description
Create spooky and delicious Halloween Apple Monster Mouths using fresh apples, creamy peanut butter, and fun candy or nut ‘teeth’ for a perfect festive snack that’s both healthy and entertaining.
Ingredients
Fruits
- 3 large apples
Spreads
- 3/4 cup creamy peanut butter
Flavor Preservers
- Sprite or lemon juice (enough to dip apples to prevent browning)
Decorations & Toppings
- Mini marshmallows or candy corn or almond slivers (to make teeth)
- Candy eyes (for monster eyes)
Instructions
- Prepare the Apples: Remove the core from each apple and slice them into even pieces. Using an apple slicer is recommended for uniform slices and ease.
- Prevent Browning: Dip the apple slices into lemon juice or Sprite briefly to prevent them from browning and maintain a fresh look.
- Assemble the Monster Mouths: Take two apple slices and spread peanut butter on one side of a slice. Press the other apple slice on top to sandwich them together. Use peanut butter as the adhesive to hold the slices. If needed, use toothpicks to secure the pieces.
- Add Monster Teeth: Stick mini marshmallows, candy corn, or almond slivers into the peanut butter around the edges to resemble monster teeth.
- Decorate with Eyes: Place candy eyes on the top apple slice to create monster eyes, bringing your apple monsters to life.
Notes
- Choosing sweet and crisp apples like Fuji or Honeycrisp will enhance the flavor and texture.
- Use lemon juice instead of Sprite for a healthier, less sugary option to prevent browning.
- Be cautious when using toothpicks with children; supervise accordingly.
- These make great healthy treats for Halloween parties, combining fun with nutrition.
Nutrition
- Serving Size: 1 monster mouth
- Calories: 150
- Sugar: 14g
- Sodium: 100mg
- Fat: 8g
- Saturated Fat: 1.5g
- Unsaturated Fat: 6.5g
- Trans Fat: 0g
- Carbohydrates: 18g
- Fiber: 3g
- Protein: 4g
- Cholesterol: 0mg


