
If you’re looking for a showstopper dessert this spooky season, let me share a fan-freaking-tastic treat that always wows: the Halloween Graveyard Cake Recipe. This cake is a delightful mix of rich chocolate, spooky decorations, and playful textures that will have your family and friends oohing and aahing. It’s perfect whether you’re hosting a Halloween party or just want to impress your crew with something festive and delicious. Plus, it’s actually super approachable, so stick around and I’ll walk you through every step.
Why You’ll Love This Recipe
- Perfect Balance of Flavors: This cake combines deep chocolate richness with light, fluffy textures that keep every bite exciting.
- Fun and Festive Presentation: The biscuit graves and chocolate finger fence make it a total conversation starter on any Halloween table.
- Easy to Make: Despite its impressive look, the recipe uses straightforward techniques that you can totally nail at home.
- Customizable Decorations: You can add jelly snakes, fondant pumpkins, or whatever spooky elements you love most to make it your own.

Ingredients You’ll Need
All the ingredients in this Halloween Graveyard Cake Recipe come together to create a moist, rich chocolate cake paired with luscious chocolate buttercream—perfect for holding those creepy graveyard decorations. Here are some tips on what you’ll want to grab from the store.
- Butter or baking spread: I prefer unsalted and softened so you can control the saltiness and get a smooth cake batter.
- Light brown soft sugar: It’s what adds that subtle caramel note that deepens the chocolate flavor beautifully.
- Eggs: Large eggs work best for binding and adding structure without making the cake dense.
- Vanilla extract: Don’t skip it—it enhances the chocolate and adds warmth.
- Milk: For moisture and a tender crumb.
- Self-raising flour: This helps the cake rise evenly so you get plenty of fluffy layers.
- Cocoa powder: Use good-quality unsweetened cocoa for a rich chocolate taste.
- Baking powder and bicarbonate of soda: Both help the cake rise and keep it light.
- Icing sugar: Essential for smooth, fluffy buttercream.
- Dark chocolate: For dipping the biscuit graves—it adds depth and a glossy finish.
- Biscoff biscuits: These make adorable tombstones, especially after being dipped in chocolate.
- White candy melts or white chocolate: Great for piping spooky designs on the tombstones.
- Chocolate fingers: These become the cake fence, adding a fun texture contrast.
- Oreos: Crushed finely, they create the eerie ‘soil’ for the graveyard top.
- Green food colouring: For that perfect grassy effect around the graves.
- Jelly snakes and fondant pumpkins (optional): Add some whimsy and extra Halloween flair.
Variations
I love how flexible this Halloween Graveyard Cake Recipe is—you can easily tweak it to suit your tastes or dietary needs. Don’t be shy to get creative!
- Gluten-Free Version: I once swapped all-purpose flour for a gluten-free self-raising flour blend with success—just watch the baking time closely.
- Dairy-Free Adaptation: Use vegan butter and plant-based milk, and you’ll have a spooky vegan-friendly cake everyone can enjoy.
- Flavor Spin: I added a pinch of instant espresso powder to amp up the chocolate intensity for a grown-up twist.
- Decoration Alternatives: Instead of jelly snakes, try gummy worms or edible spider rings for extra fun.
How to Make Halloween Graveyard Cake Recipe
Step 1: Prepare Your Pan and Preheat Your Oven
Start by preheating your oven to 160°C fan (or 180°C conventional). Grease and line a 12” x 9” traybake tin well with baking paper, so the cake releases easily after baking. I always run a knife around the edges once it cools to help loosen it.
Step 2: Cream Butter and Sugar
In a large bowl, mix softened butter or baking spread with light brown sugar until the mixture is light and fluffy. This usually takes about 2-3 minutes if you’re using an electric mixer—trust me, it makes a difference! This fluffy base is what creates a beautifully tender crumb.
Step 3: Add Eggs, Milk, and Vanilla
Beat in the eggs one at a time, followed by the milk and vanilla extract. Make sure everything is well incorporated, but don’t overmix here—otherwise, the cake can get tough.
Step 4: Fold in Dry Ingredients
Sift your self-raising flour, cocoa powder, baking powder, and bicarbonate of soda together. Gently fold this mix into the wet ingredients—this keeps your batter light and prevents overworking the gluten.
Step 5: Bake and Cool
Pour your batter evenly into the prepared tin and bake for 25–30 minutes. To check doneness, insert a skewer into the center; it should come out clean or with a few moist crumbs. Once done, let the cake cool completely in the tin or transfer to a cooling rack. I like to let it cool fully before frosting—that way, the buttercream won’t melt.
Step 6: Make Biscuit Graves
While the cake cools, snap about a third off the end of each Biscoff biscuit—this makes them a perfect tombstone size. Melt the dark chocolate and dip each biscuit, shaking off extra chocolate gently. Lay them on baking paper to set. Once the dark chocolate hardens, melt some white candy melts and pipe ghostly designs onto the biscuits using a small snipped piping bag. These little tombstones are always a hit.
Step 7: Whip Up Chocolate Buttercream
Using a mixer with a paddle attachment, beat the softened butter until smooth and creamy. Add the icing sugar, cocoa powder, and milk, mixing until you get a luscious, spreadable buttercream. If it feels stiff, add a splash more milk until you hit that perfect consistency. I love how this frosting is rich yet fluffy—ideal for frosting and decorating.
Step 8: Frost and Decorate the Cake
Using an angled palette knife makes frosting so much easier—I find it helps me get a smooth finish all over the top and sides. Next, break chocolate fingers into varying lengths and gently press them, broken side down, around the cake’s sides to form a spooky fence. Cover the top with finely crushed Oreo crumbs—the perfect “soil.”
Step 9: Create the Graveyard Scene
Carefully cut small slits on the cake’s top for the biscuit graves to stand upright—gently push them into place. Then scatter your jelly snakes, fondant pumpkins, or any other creepy decorations you like. It’s so fun seeing this gothic graveyard come to life!
Step 10: Add Grass Buttercream
Mix softened butter, icing sugar, vanilla extract, and green food colouring until smooth. If you have a stand mixer or handheld mixer, it will soften your job. Fill a piping bag fitted with a multi-opening grass nozzle and pipe grass around the graves and in random patches. If you don’t have a grass nozzle, just dot small blobs and flick with the back of a spoon for texture. The green grass adds a nice liveliness to the spooky scene.
Step 11: Serve and Enjoy
Slice into squares and gather everyone around. This cake always gets raves for being as fun to look at as it is delicious to eat.
Pro Tips for Making Halloween Graveyard Cake Recipe
- Don’t Skip Softening Butter: Soft butter creams so much better with sugar, giving you that fluffy cake and silky frosting I love.
- Use an Angled Palette Knife: It makes frosting the cake easier, especially when smoothing the sides around the chocolate finger fence.
- Set the Biscuit Graves Firmly: Snip smaller slits for a snug fit so the tombstones stand upright without toppling over.
- Cool Cake Completely: Applying buttercream too soon causes it to melt and slide—trust me, wait it out for neat results.
How to Serve Halloween Graveyard Cake Recipe
Garnishes
I always love adding those jelly snakes slithering around the graves—they’re just too cute and perfect for the theme. Fondant pumpkins bring a pop of color and extra charm. If you want to get playful, you could sprinkle edible glitter dust over the green buttercream grass for a magical, eerie shine.
Side Dishes
This cake stands out on its own, but if you’re serving a Halloween feast, I like pairing it with a scoop of vanilla ice cream or spooky-themed whipped cream—imagine a little “potion” drizzle of raspberry sauce for contrast. It perfectly balances the rich chocolate flavors.
Creative Ways to Present
I once placed this cake on a tray of crumbled Oreos for extra soil effect, surrounded by plastic skeletal hands reaching out—it looked like the graveyard was coming to life! Another fun idea is to use a fog machine or dry ice nearby for dramatic mist creeping over the cake at parties.
Make Ahead and Storage
Storing Leftovers
I keep leftovers in an airtight container stored in a cool room (not the fridge unless it’s quite warm in your kitchen) and eat them within 3 days. The cake stays moist and the decorations hold up nicely if you’re careful with handling.
Freezing
Freezing the unfrosted cake works really well—just wrap tightly in cling film and foil. Then, when you’re ready, thaw it fully before decorating. I’ve found frosting holds up better fresh, but you can freeze the whole decorated cake briefly if needed; in that case, just be gentle when thawing to avoid condensation ruining the decorations.
Reheating
This cake is best eaten cold or at room temperature. If you want to warm a slice a little (maybe with ice cream), do so very briefly in the microwave—just 10 seconds or so—to avoid melting the decorations or buttercream too much.
FAQs
-
Can I make the Halloween Graveyard Cake Recipe ahead of time?
Absolutely! You can bake the cake a day in advance and keep it wrapped in cling film at room temperature. I usually add the buttercream and decorations the day you plan to serve it for the freshest look and taste.
-
What if I don’t have Biscoff biscuits for the tombstones?
No worries! You can substitute with graham crackers, ginger snaps, or any rectangular biscuit that’s sturdy enough to stand upright when dipped in chocolate.
-
How do I troubleshoot cracked or dry cake?
Make sure not to overbake—the cake’s moisture depends on timing. Also, avoid overmixing the batter, which can develop gluten and make it dense. Properly softened butter and careful folding help keep it tender.
-
Can I use regular cocoa instead of unsweetened cocoa powder?
Regular cocoa usually means unsweetened cocoa powder in recipes. Just avoid sweetened or Dutch-processed unless you adjust other ingredients accordingly, as it affects flavor and texture.
-
How do I make the grass buttercream look realistic?
Using a piping bag with a grass tip is key—you pipe short bursts to create the grassy texture. Mixing enough green food coloring to reach a vibrant shade also gives it that perfect look. Don’t rush piping; take your time for neat results!
Final Thoughts
This Halloween Graveyard Cake Recipe has a special place in my heart because it brings together everything I love about baking: creativity, family fun, and delicious flavors. When I first made it, the smile on everyone’s face was priceless. I hope you enjoy making it as much as I do, and that it becomes a tradition for your spooky celebrations. Trust me—I’m already planning to make it again this year, and you should too!
Print
Halloween Graveyard Cake Recipe
- Prep Time: 20 min
- Cook Time: 25 min
- Total Time: 75 min
- Yield: 12 servings
- Category: Baking
- Method: Baking
- Cuisine: British
Description
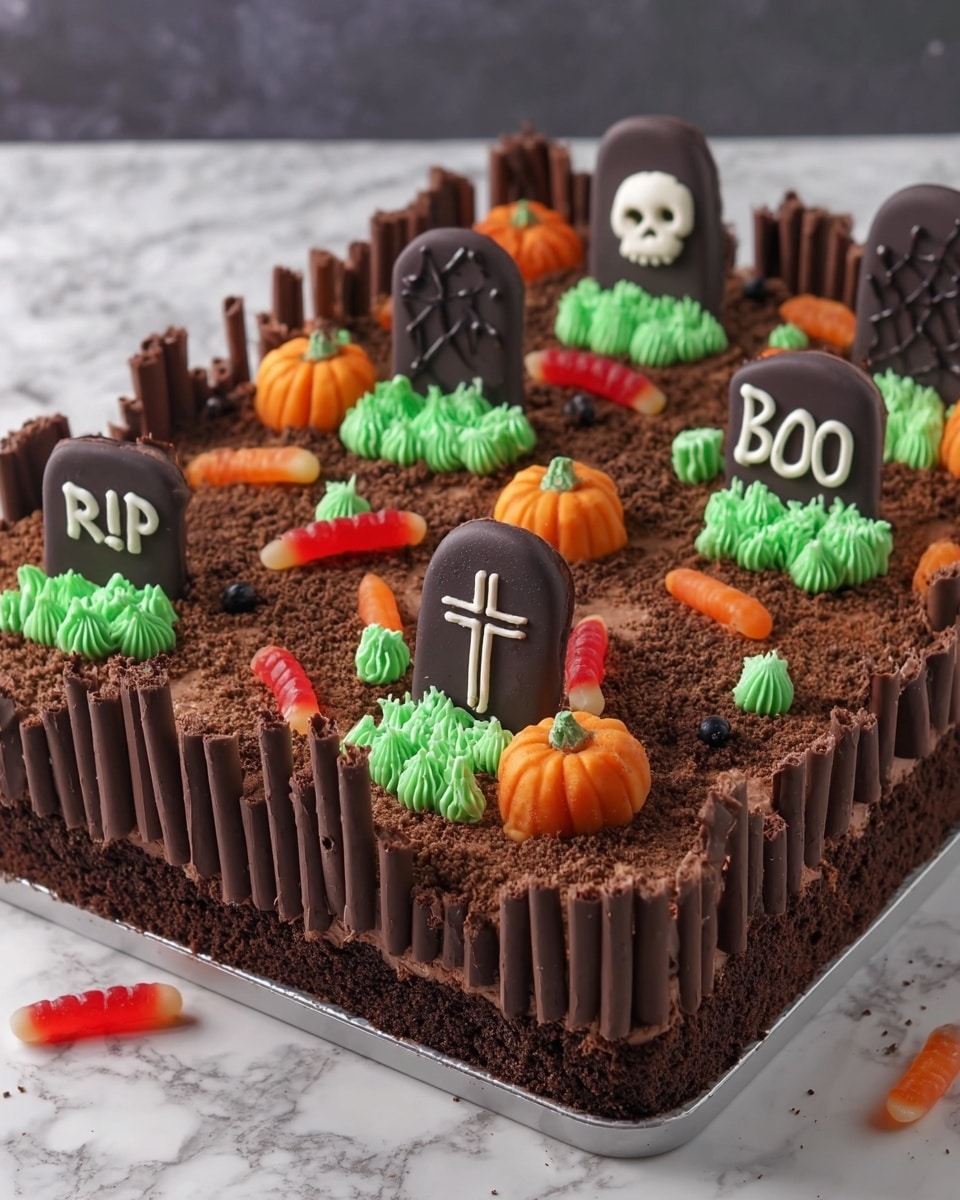
A spooky and fun Halloween Graveyard Cake with rich chocolate flavor, decorated with Oreo ‘soil’, biscuit tombstones dipped in chocolate, a chocolate finger fence, and optional jelly snakes and fondant pumpkins. Perfect for Halloween celebrations and chocolate lovers.
Ingredients
Cake
- 225 g Butter or baking spread (unsalted, softened)
- 225 g Light brown soft sugar
- 4 Eggs (large)
- 1 tsp Vanilla extract
- 75 ml Milk
- 175 g Self-raising flour
- 50 g Cocoa powder
- 1/4 tsp Baking powder
- 1/4 tsp Bicarbonate of soda
Chocolate Buttercream
- 200 g Butter (unsalted, softened)
- 325 g Icing sugar
- 75 g Cocoa powder
- 3 tbsp Milk (plus more if needed)
Biscuit Graves Decoration
- 8 Biscoff biscuits
- 125 g Dark chocolate (melted)
- 25 g White candy melts (or white chocolate)
Additional Decorations
- 200 g Chocolate fingers
- 120 g Oreos (crushed into crumbs)
- Jelly snakes (optional)
- Fondant pumpkins (optional)
Green Grass Buttercream
- 25 g Butter (unsalted, softened)
- 50 g Icing sugar
- 1/8 tsp Vanilla extract
- 1/4 tsp Milk
- Green food colouring
Instructions
- Preheat and prepare tin: Pre-heat your oven to 160°C Fan/180°C/350°F/Gas Mark 4. Grease and line a 12″ x 9″ traybake tin with baking paper to prevent sticking.
- Make the cake batter: In a large bowl, beat the unsalted softened butter or baking spread and light brown soft sugar with an electric mixer until fluffy, about 2-3 minutes. Add the eggs, milk, and vanilla extract and mix until fully incorporated.
- Incorporate dry ingredients: Gently fold in the self-raising flour, cocoa powder, baking powder, and bicarbonate of soda until just combined without overmixing.
- Bake the cake: Pour the batter evenly into the prepared tin and smooth the top. Bake for 25-30 minutes or until a skewer inserted in the center comes out clean. Allow the cake to cool completely in the tin or on a cooling rack.
- Prepare biscuit graves: While the cake is baking and cooling, snap about a third off the end of each Biscoff biscuit to make them shorter. Melt the dark chocolate and dip each biscuit, shaking off excess chocolate. Place on baking paper to set.
- Decorate tombstones: Once the dark chocolate has set on the biscuits, melt the white candy melts and put into a piping bag with a small cut at the end. Pipe designs onto the chocolate-dipped biscuits and let set completely.
- Make chocolate buttercream: Using an electric mixer with a paddle attachment, beat 200 g softened butter for several minutes until creamy. Add the icing sugar, cocoa powder, and milk, and beat until well combined and smooth. Adjust milk quantity if buttercream is too stiff.
- Frost the cake: Using an angled palette knife, spread the chocolate buttercream evenly over the top and sides of the cooled cake.
- Attach chocolate finger fence: Break chocolate fingers into varying lengths. Press them into the sides of the cake with the broken side down, pressing gently so they stick to the buttercream.
- Add Oreo soil: Cover the top surface of the cake with crushed Oreo crumbs to resemble soil.
- Place biscuit graves: Cut slits into the top of the cake where you want to position the biscuit tombstones. Gently push the decorated biscuits into the slits upright.
- Decorate with extras: Add optional jelly snakes, fondant pumpkins, or any other Halloween-themed decorations around the graves and surface of the cake.
- Make green grass buttercream: Mix 25 g softened butter and 50 g icing sugar until smooth. Add vanilla extract, milk, and green food colouring and beat until smooth and desired shade is achieved. Use a stand or handheld mixer for best results.
- Pipe grass decoration: Transfer green buttercream to a piping bag fitted with a multi-opening grass nozzle. Pipe grass around the biscuit graves and randomly across the cake. Alternatively, use a spoon to add small blobs and flick the back of the spoon to create textured grass.
- Serve and store: Slice the cake into squares to serve. Store leftovers in an airtight container in a cool place and consume within 3 days.
Notes
- A deliciously spooky chocolate traybake cake with Oreo soil, biscuit tombstones, a chocolate finger fence, and optional jelly snakes—perfect for Halloween celebrations.
- You can customize the decorations with other Halloween-themed candy or fondant shapes.
- Ensure the cake is fully cooled before applying buttercream to prevent melting.
- If the buttercream is too stiff, add milk gradually to reach desired consistency for spreading and piping.
- Store the cake properly to maintain freshness and texture, ideally in a cool environment but not refrigerated to avoid hardening the decorations.
Nutrition
- Serving Size: 1 serving
- Calories: 800 kcal
- Sugar: 58 g
- Sodium: 372 mg
- Fat: 42 g
- Saturated Fat: 25 g
- Unsaturated Fat: 15 g
- Trans Fat: 1 g
- Carbohydrates: 84 g
- Fiber: 6 g
- Protein: 8 g
- Cholesterol: 137 mg


