
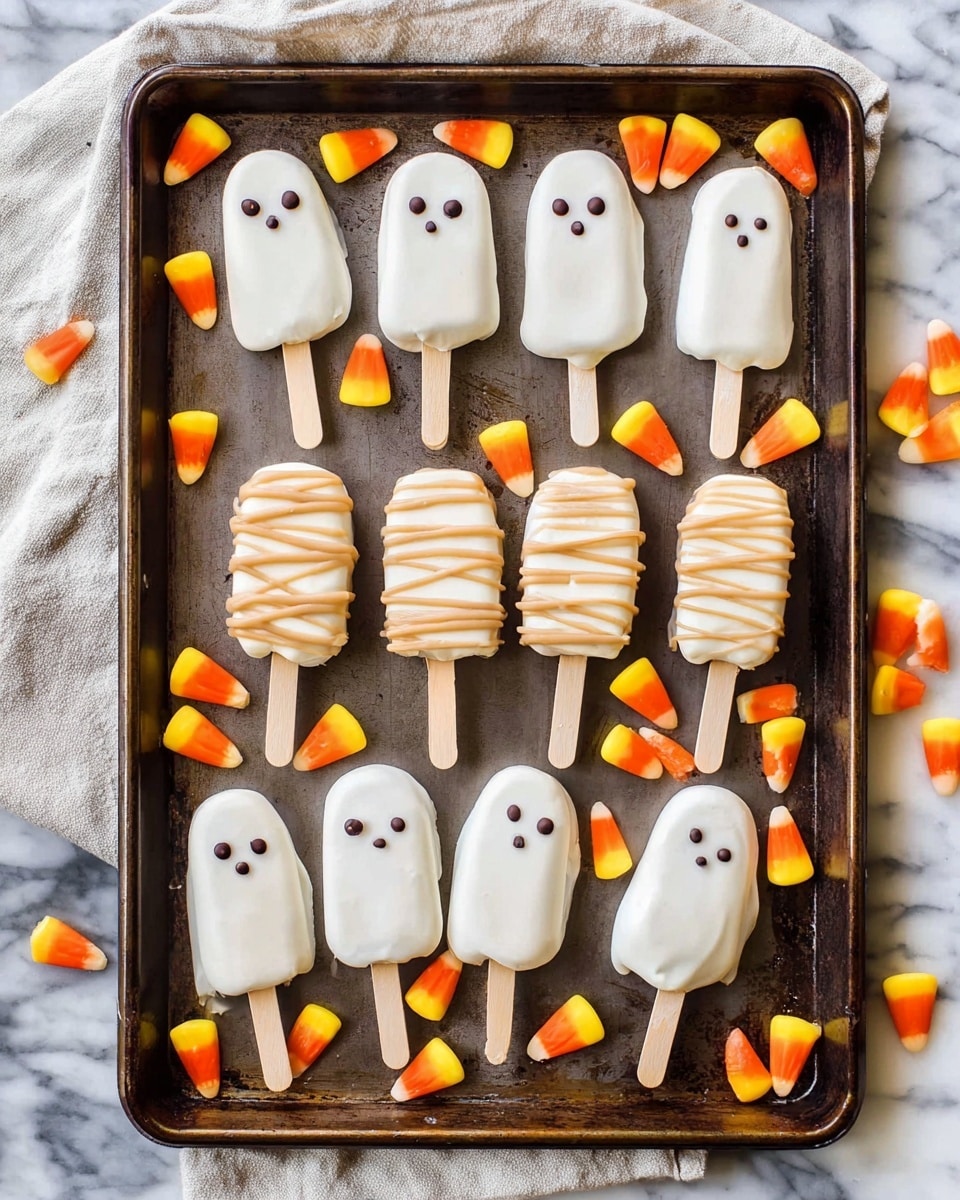
If you’re on the lookout for a spooky yet healthy treat this season, you’re going to adore this Halloween Banana Popsicles Recipe. It’s a fun, kid-friendly way to celebrate Halloween without the usual sugar overload. I absolutely love how these popsicles strike the perfect balance between creamy yogurt, natural peanut butter, and sweet banana—all dressed up as adorable ghosts and mummies. Stick with me, and I’ll share all the tricks to help you nail it every time!
Why You’ll Love This Recipe
- Healthy & Kid-Friendly: These popsicles are packed with natural ingredients and perfect for little hands during Halloween celebrations.
- Simple Ingredients: You probably already have everything in your fridge, making it super easy to whip up on a whim.
- Fun & Festive: The ghost and mummy designs make these treats a crowd-pleaser at parties, and kids will love helping out.
- Make-Ahead Friendly: Prep ahead and freeze these popsicles—they stay delicious for weeks.

Ingredients You’ll Need
Choosing the right ingredients really makes this Halloween Banana Popsicles Recipe shine. I like bananas that are ripe enough to be sweet but still firm so they hold up well in the mold. Greek yogurt adds creaminess and protein, while a touch of powdered sugar balances tartness. And of course, peanut butter gives that mummy extra texture and flavor!
- Bananas: Pick firm, fresh bananas that aren’t overly ripe; they’ll freeze better and hold their shape nicely for decorating.
- Nonfat Greek vanilla yogurt: The slight sweetness and creaminess helps create that ghostly white coating.
- Powdered sugar: Adds a gentle sweetness to the yogurt mixture without graininess.
- Mini semi-sweet chocolate chips: Perfect for creating cute little eyes on both ghosts and mummies.
- Popsicle sticks: Essential for holding it all together and making these easy to eat.
- Creamy natural peanut butter: This is key for making the mummy “bandages”—go for a smooth texture for easier drizzling.
Variations
I love how flexible this Halloween Banana Popsicles Recipe can be! Over the years, I’ve tweaked it a bit depending on what I have and what my family’s in the mood for. Feel free to play around with ingredients and decorations to suit your style.
- Nut-Free Version: Swap the peanut butter mummy “bandages” for sunflower seed butter or a yogurt drizzle if you’re avoiding nuts—still delicious and just as festive.
- Chocolate Lovers’ Twist: I once added a bit of cocoa powder into the yogurt mix for a chocolate ghost coating—super tasty if you want to switch things up.
- Seasonal Fruit Pops: For a berry twist, try blending some fresh strawberries into the yogurt before dipping the bananas; your kids won’t even notice the difference.
- Extra Crunch: Rolling the dipped bananas in crushed nuts or coconut flakes before freezing creates a delightful texture contrast.
How to Make Halloween Banana Popsicles Recipe
Step 1: Prepare Your Banana Ghosts and Mummies
The first time I tried this, I realized slicing the bananas correctly was crucial to getting those perfect ghost and mummy shapes that are easy to handle. Start by peeling two bananas and slicing each one into four long strips by cutting in half crosswise, then slicing each half lengthwise. These will become your ghosts. For the mummies, trim the pointy tips off the remaining two bananas, then slice them into three round “logs.” This might seem fiddly, but taking time here pays off when your pops look so cute. Don’t forget to insert the popsicle sticks carefully at one end so they’re secure for freezing and decorating.
Step 2: Freeze the Bananas
Place all your banana pops on a parchment-lined baking sheet and freeze for at least 30 minutes or even overnight. Don’t skip this step—freezing firm bananas help the yogurt coating stick nicely and prevent sogginess later on. The first time I rushed this, the yogurt kept sliding off, so trust me on this one!
Step 3: Mix Your Yogurt Coating
While your bananas are chilling, stir together the Greek vanilla yogurt and powdered sugar in a small bowl. This mixture is the key to that creamy, ghostly look your pops will have. I like to taste it here—if you want sweeter pops, feel free to add a pinch more sugar, but remember the bananas add natural sweetness too.
Step 4: Dip and Decorate Your Ghosts
Once the bananas are frozen solid, gently dip each ghost into the yogurt mixture, coating it evenly. Place them back on the baking sheet, then carefully press two mini chocolate chips on each ghost for eyes right away before the yogurt sets. These little touches bring the pops to life! Then pop them back in the freezer for at least an hour while the yogurt firms up.
Step 5: Make the Peanut Butter Bandages for Mummies
For your mummy popsicles, warm the creamy natural peanut butter in a microwave-safe bowl for about 30–45 seconds until it becomes smooth and drizzle-friendly. Using a small spoon or even a piping bag, drizzle the peanut butter over each frozen banana “log” in overlapping lines to mimic mummy bandages. Then, add two mini chocolate chip eyes before freezing for another 30 minutes to set. This step makes the mummies irresistibly cute.
Step 6: Ready to Enjoy!
When you’re ready to serve, let the pops soften a few minutes at room temperature—that way, they’re easier to bite into but still refreshingly cold. I promise, your family will go crazy for these adorable, tasty, and healthy treats!
Pro Tips for Making Halloween Banana Popsicles Recipe
- Choose Firm Bananas: I’ve learned skipping overly ripe bananas helps prevent the pops from becoming mushy once frozen and dipped.
- Freeze Thoroughly: Make sure to freeze the banana pieces solid before dipping, or the yogurt won’t stick well.
- Use a Piping Bag for Peanut Butter: It’s way easier to create those mummy “bandages” than trying to drizzle with a spoon.
- Work Quickly: The yogurt coating can melt fast if your hands are warm, so dip and decorate efficiently.
How to Serve Halloween Banana Popsicles Recipe
Garnishes
I usually keep it simple with the mini chocolate chip eyes, but for extra Halloween flair, you can sprinkle edible glitter or crushed Halloween-themed sprinkles on the yogurt before freezing. It adds a subtle sparkle that kids think is magic!
Side Dishes
These popsicles pair wonderfully with a warm cup of apple cider or a fresh autumn fruit salad. I’ve served them alongside pumpkin muffins for school parties, and they were a huge hit since the cold treat balances the warm baked goods perfectly.
Creative Ways to Present
For a Halloween party, I like to arrange the popsicles upright in a pumpkin-shaped container filled with dry ice—safe and spooky! Kids love the misty effect as they pick their ghost or mummy. Another idea is to wrap each popsicle in a little cellophane bag tied with orange and black ribbons for festive take-home treats.
Make Ahead and Storage
Storing Leftovers
If you have any leftovers (which is rare in my house), I store them in a zip-top freezer bag with parchment paper between each pop to prevent sticking. They stay fresh and delicious for up to two months this way.
Freezing
Freezing is really straightforward. Once dipped and decorated, freeze them on a tray so they’re firm, then transfer to a sealed container or bag. I’ve never had issues with freezer burn since the yogurt coats them well and the banana’s texture holds up.
Reheating
Since these are popsicles, reheating isn’t really needed, but I let them soften at room temperature for about 5 minutes before serving. This short thaw makes them easy to bite into while still maintaining their cool, refreshing nature.
FAQs
-
Can I use regular yogurt instead of Greek yogurt for this Halloween Banana Popsicles Recipe?
Yes, you can substitute regular yogurt; however, Greek yogurt tends to be thicker and creamier, which helps the coating stick better and gives that rich texture you want in these pops. If you use regular yogurt, consider draining it a bit to remove excess liquid.
-
How long will these banana popsicles keep in the freezer?
Stored properly in an airtight container or freezer bag with parchment paper between pops, they will stay fresh and tasty for up to two months. After that, they might develop freezer burn or slight texture changes.
- Is it possible to make this recipe nut-free?
Absolutely! You can skip the peanut butter completely or swap it for a nut-free alternative like sunflower seed butter or simply drizzle more yogurt coating. The mummy “bandages” won’t be quite the same but still cute and tasty.
-
What if I don’t have popsicle sticks?
If you’re out of popsicle sticks, you can use small wooden skewers or even sturdy toothpicks for smaller pops. Just be sure they’re long enough for a good grip and food-safe.
Final Thoughts
This Halloween Banana Popsicles Recipe is one of those gems I keep coming back to year after year. It’s simple, fun to make, and brings a little magic to your kitchen without the sugar crash. I love seeing my kids’ eyes light up when they spot the ghost and mummy designs—they’re almost too cute to eat (but trust me, you’ll want to dig in right away). Give this a try—it’s an easy win for a festive, healthy Halloween treat that everyone will enjoy!
Print
Halloween Banana Popsicles Recipe
- Prep Time: 15 minutes
- Cook Time: 0 minutes
- Total Time: 2 hours
- Yield: 14 popsicles (8 ghosts and 6 mummies)
- Category: Dessert
- Method: Freezing
- Cuisine: American
- Diet: Low Fat
Description
Delightfully spooky and healthy Halloween Banana Popsicles shaped like ghosts and mummies, featuring fresh bananas dipped in vanilla Greek yogurt and decorated with mini chocolate chips and creamy peanut butter. These fun, kid-friendly snacks are perfect for a festive treat that’s both nutritious and easy to prepare.
Ingredients
Banana Popsicle Ghosts:
- 2 large fresh bananas (not overly ripe)
- 8 popsicle sticks
Banana Popsicle Mummies:
- 2 large fresh bananas (not overly ripe, pointy tips cut off)
- 8 popsicle sticks
Coating and Decorations:
- 1 cup nonfat Greek vanilla yogurt
- 2 tablespoons powdered sugar
- Mini semi-sweet chocolate chips (for eyes)
- 1/3 cup creamy natural peanut butter
Instructions
- Prepare Banana Popsicle Ghosts: Line a baking sheet with parchment paper or a silpat mat. Peel 2 bananas and slice each in half crosswise. Then slice each half again lengthwise to create 4 long, narrow banana pieces. Carefully insert a popsicle stick into the bottom of each piece and place on the prepared baking sheet.
- Prepare Banana Popsicle Mummies: Cut off the pointy tips from the remaining 2 bananas and slice each banana crosswise into 3 equal round logs. Insert a popsicle stick into one end of each segment and arrange on the baking sheet alongside the ghost popsicles. Freeze all bananas for at least 30 minutes or overnight to firm up.
- Mix Yogurt Coating: In a small bowl, combine the nonfat Greek vanilla yogurt and powdered sugar until smooth. Once frozen, dip each banana piece into the yogurt mixture coating evenly, then return to the baking sheet. Decorate the ghosts by placing two mini chocolate chips on each for eyes. Do not add eyes to the mummies yet. Freeze for at least 1 hour to let the yogurt coating set.
- Decorate the Mummies: Microwave the peanut butter in a small microwave-safe bowl for 30-45 seconds until smooth and creamy, stirring occasionally. Using a small spoon, drizzle the peanut butter over the mummy banana popsicles to mimic mummy bandages. Add two mini chocolate chips per mummy for eyes. Return to the freezer for about 30 minutes until the peanut butter firms up.
- Serve and Store: When ready to enjoy, let the banana pops soften at room temperature for a few minutes. Serve immediately or store in a zip-top bag and freeze for up to 2 months for convenient future treats.
Notes
- These yogurt-dipped banana popsicles are a fun, healthy Halloween treat that kids can help make.
- Using bananas that are ripe but not overly soft will help ensure firm popsicles.
- You can substitute peanut butter with any nut or seed butter if preferred or for allergies.
- Freeze in a single layer initially to keep shapes intact and prevent sticking.
- Perfect snack for school parties or home celebrations.
Nutrition
- Serving Size: 1 banana popsicle without peanut butter
- Calories: 53 kcal
- Sugar: 7 g
- Sodium: 7 mg
- Fat: 0.2 g
- Saturated Fat: 0 g
- Unsaturated Fat: 0.2 g
- Trans Fat: 0 g
- Carbohydrates: 12 g
- Fiber: 1 g
- Protein: 2 g
- Cholesterol: 1 mg
