
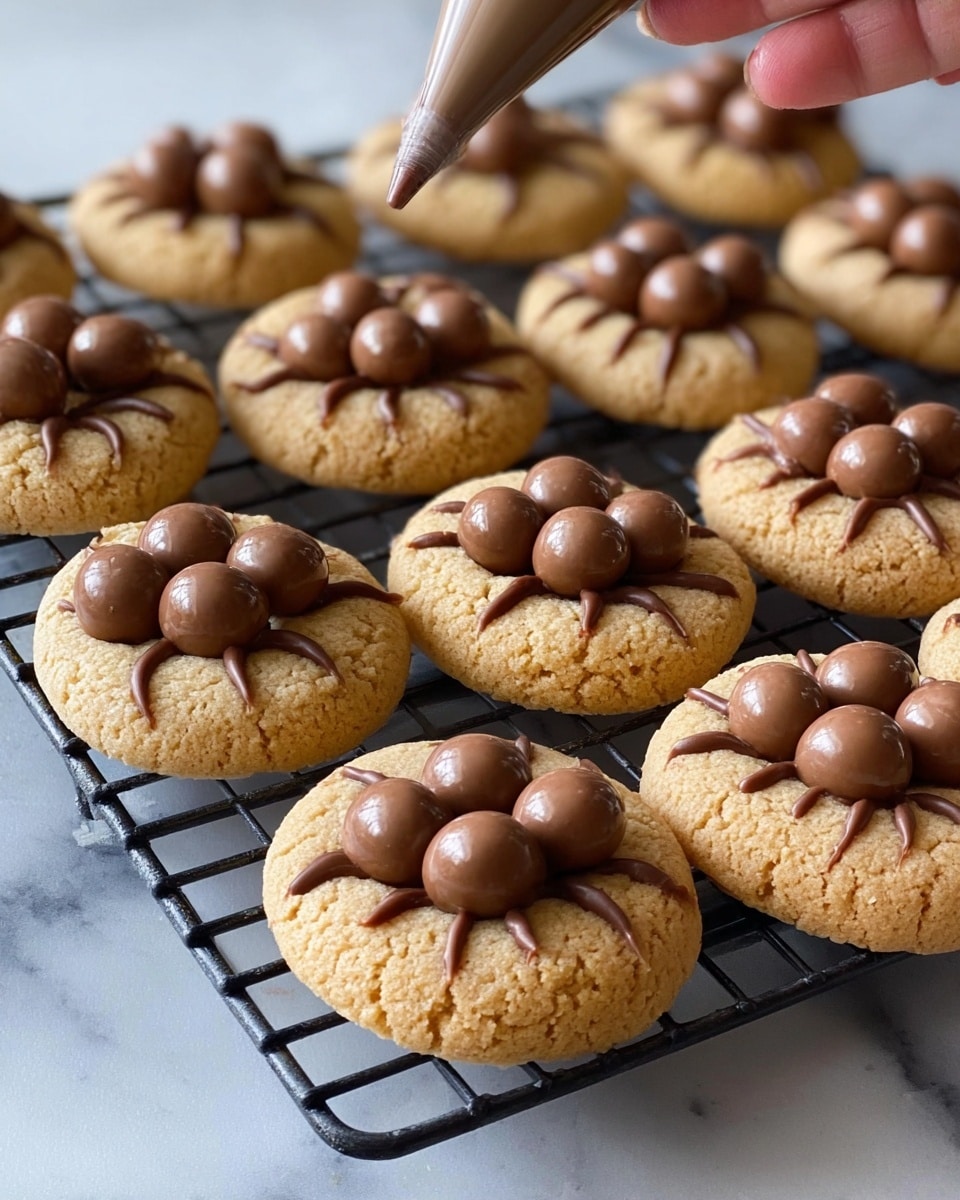
If you’re scouting for a fun, festive treat that’s both adorable and absolutely delicious, then this Halloween Spider Cookies Recipe is going to be your new best friend in the kitchen. These chewy cookies topped with chocolatey spiders are not only Instagram-worthy but also a hit with kids and adults alike. I promise, you’ll find this recipe easy to follow and just the right level of spook-tacular to wow your Halloween guests or just indulge your sweet tooth with a bit of festive flair!
Why You’ll Love This Recipe
- Super Fun Design: The little chocolate spiders add a playful touch that kids and adults both adore.
- Chewy and Soft Cookies: These cookies come out perfectly soft in the middle with just enough chew to keep you coming back for more.
- Simple Ingredients: You probably have most of these pantry staples already, so it’s quick to whip up when the Halloween craving hits.
- Great for Gifting: These are perfect for party favors or cute gifts stuffed in a cellophane bag with a bow.

Ingredients You’ll Need
To nail this Halloween Spider Cookies Recipe, you’ll want ingredients that combine for a rich, soft cookie base topped with melty chocolate and crunchy Maltesers. Each one plays a role in ensuring the cookies bake up just right!
- Butter: It’s the backbone for soft, chewy texture—room temperature butter melts easily, giving the cookie dough that richness.
- Brown Sugar: Adds moisture and depth of flavor for that chewy texture I love.
- White Sugar: Balances sweetness and helps with the cookie’s light golden color.
- Egg: Binds everything together while adding a bit of richness.
- Vanilla Essence: It enhances all the other flavors beautifully.
- Plain Flour: The main dry ingredient that gives the dough structure.
- Salt: Just a pinch to pop the sweetness and balance the flavors.
- Baking Soda: Helps the cookies lift slightly and get that perfect texture.
- Cornflour: This little addition softens and lightens the dough to keep the cookies tender.
- Maltesers: The secret weapon for the “spider body” — crunchy and chocolatey, they add a whimsical vibe.
- Dark Chocolate (melted): Use this to pipe the spider legs and details – it hardens nicely for that perfect finish.
- White Icing: To dot the eyes and give your spiders that extra creepy-cute personality.
Variations
I love encouraging folks to make this Halloween Spider Cookies Recipe their own! There are a few tweaks I’ve tried at home that keep things interesting without losing any of the fun.
- Swap the Maltesers: I’ve replaced them with mini peanut butter cups for a richer twist that my kids couldn’t get enough of.
- Use White Chocolate: Instead of dark chocolate for the spider legs, white chocolate works great and brightens up the look. You can even tint it with food coloring.
- Make Them Gluten-Free: Substitute plain flour with a 1:1 gluten-free baking flour blend; just be mindful that baking times might vary slightly.
- Add a Touch of Cinnamon: I stirred in a pinch of cinnamon for subtle warmth that made these cookies extra cozy and seasonal.
How to Make Halloween Spider Cookies Recipe
Step 1: Melt and Mix the Butter and Sugars
Pop your butter into a large glass bowl and microwave it for about 30 to 50 seconds until melted (watch closely so it doesn’t bubble over). Whisk that smooth and then add both your brown and white sugars along with the egg and vanilla essence. I like to whisk until the mixture is silky with no lumps—this is really important to give the cookies a lovely even texture.
Step 2: Incorporate the Dry Ingredients
Sift the plain flour, salt, baking soda, and cornflour right over the wet mix. Folding them in gently with a spatula helps keep the dough tender. The dough will look quite soft and thick; if your kitchen is warm and the dough feels sticky, pop it in the fridge or even the freezer for a bit until it’s cool enough to handle and roll.
Step 3: Shape and Bake the Cookies
Preheat your oven to 170°C fan bake (or 350°F conventional). Roll the dough into balls about two tablespoons each—about 30 to 40 grams. Place them spaced on a lined baking tray and gently press down to flatten slightly. Bake for 12-15 minutes. You want the edges to turn lightly golden while the center stays soft. This soft center is what makes these cookies so irresistibly chewy.
Step 4: Add the Spider Bodies
While the cookies are still warm and soft, push two Maltesers into each one for the spider’s body. This is the fun part! The slight warmth helps them settle in and stick. After 10 minutes, transfer the cookies to a wire rack to cool completely before decorating further.
Step 5: Pipe the Legs and Add Eyes
Melt your dark chocolate and transfer it to a small zip-lock bag (or piping bag) and snip a tiny corner off. Pipe four spider legs on each side of the Maltesers. Then, give each spider a pair of eyes using white icing dots, finishing with a tiny dark chocolate dot inside each to bring them to life. Let these decorations harden completely before serving.
Pro Tips for Making Halloween Spider Cookies Recipe
- Don’t Overbake: Take the cookies out just as the edges start to turn golden because they’ll continue to set while cooling, keeping them delightfully soft inside.
- Chill the Dough When Needed: If your dough feels too sticky to roll, chilling it makes it easier to handle without messing with the texture.
- Use a Piping Bag for Precision: A zip-lock bag with a tiny snip works wonders for piping spider legs neatly—practice makes perfect!
- Let Chocolate Set Fully: Resist the temptation to eat before the chocolate legs harden or they might smudge and lose their spider shape.
How to Serve Halloween Spider Cookies Recipe
Garnishes
I usually keep it simple with just the chocolate spiders and white icing eyes because the design itself steals the show. But if you want an extra touch, try dusting a little cocoa powder or edible glitter lightly over the platter for a spooky shimmer effect. It makes these cookies perfect centerpieces for your Halloween dessert table.
Side Dishes
Pair these cookies with a steaming cup of spiced hot chocolate or a chilled glass of milk. For parties, I love serving them alongside mini pumpkin-shaped cupcakes or some fresh fruit slices to balance the sweetness.
Creative Ways to Present
For a fun presentation, arrange these spider cookies on black lace doilies or on a tray lined with shredded “webbing” (think cotton wool stretched out a bit). You can even swap Maltesers with candy eyeballs for a different creepy twist that’s sure to get everyone talking at your Halloween bash.
Make Ahead and Storage
Storing Leftovers
I’ve found that storing your Halloween Spider Cookies Recipe in an airtight container at room temperature keeps them fresh and chewy for up to a week. Just be sure to layer them gently with parchment paper between layers to keep the chocolate legs from sticking or breaking off.
Freezing
If you want to make these ahead of time, the cookie dough freezes beautifully before baking. Just roll balls of dough, freeze on a tray, then pop them into a zip-lock bag. When ready, bake straight from frozen—just add a couple of extra minutes to your baking time. I don’t suggest freezing fully decorated cookies, though, as the chocolate can get tricky.
Reheating
Leftover cookies can be refreshed with a quick 10-second zap in the microwave (watch closely!) to soften them up just a touch before serving. This little trick brought my cookies back to that “freshly baked” feel, especially when they’d firmed up a bit overnight.
FAQs
-
Can I use a different candy instead of Maltesers for the spider body?
Absolutely! Maltesers work great because of their size and crunch, but you can substitute them with other round chocolates like Reese’s Pieces, Hershey’s Kisses, or even small peanut butter cups. Just pick candies that are easy to press into the cookie while it’s still warm.
-
What if I don’t have cornflour? Can I skip it?
You can skip cornflour if you don’t have it, but keep in mind that it helps soften the cookie’s texture. Without it, cookies might be a bit firmer or less tender. If you want a substitute, some people use arrowroot powder or additional plain flour in small amounts.
-
How do I make sure the chocolate spider legs don’t smudge?
Once you’ve piped the legs with melted chocolate, let the cookies sit undisturbed at room temperature until the chocolate sets hard. If you want to speed this up, place the cookies in the fridge for about 15 minutes, but be careful not to chill too long or condensation can form.
-
Can I make this dough vegan?
Yes! Try swapping butter with vegan margarine, and use a flaxseed or chia egg (1 tbsp ground seeds + 3 tbsp water). Double-check your chocolate and icing are vegan-friendly, and you’re set for vegan Halloween spider treats.
Final Thoughts
I absolutely love how this Halloween Spider Cookies Recipe brings so much joy and a little bit of cheeky fun into my kitchen every October. There’s something magical about watching these cookies come alive with their chocolate legs and playful eyes that turns baking into a festive celebration. Whether you’re baking with kids or hosting a Halloween party, these cookies never fail to impress. Give them a try—you’ll be thrilled with how easy and delightful they turn out!
Print
Halloween Spider Cookies Recipe
- Prep Time: 20 minutes
- Cook Time: 12-15 minutes
- Total Time: 32-35 minutes
- Yield: 20 cookies
- Category: Dessert
- Method: Baking
- Cuisine: Western
Description
Halloween Spider Cookies are fun and chewy treats perfect for celebrating the spooky season. These soft cookies are topped with chocolate spiders made from Maltesers, melted dark chocolate, and white icing for eyes, making them a delightful and festive snack for kids and adults alike.
Ingredients
Cookie Dough
- 150g butter
- ½ cup brown sugar (100g)
- ½ cup white sugar (110g)
- 1 egg
- 1 tsp vanilla essence
- 2 cups plain flour (300g)
- ¼ tsp salt
- 1 tsp baking soda
- 2 Tbsp cornflour
Decoration
- 140g bag Maltesers
- 100g dark chocolate, melted
- 1 small tube white icing
Instructions
- Melt Butter: In a large glass bowl, melt the butter in the microwave for 30 to 50 seconds, ensuring it is soft but not overheated.
- Mix Wet Ingredients: Whisk the melted butter, then add the brown sugar, white sugar, egg, and vanilla essence. Mix thoroughly until smooth and lump-free.
- Combine Dry Ingredients: Sift together the plain flour, salt, baking soda, and cornflour over the wet mixture. Fold gently until just combined into a thick, soft dough.
- Chill Dough: If the dough feels too warm and soft to roll, chill it in the fridge or freezer until cool enough to handle and form balls.
- Preheat Oven: Preheat your oven to 170°C (fan bake).
- Shape Cookies: Roll dough into balls weighing about 30-40g (approximately 2 tablespoons) each. Place them spaced on a lined baking tray and gently push down to flatten slightly.
- Bake: Bake the cookies for 12-15 minutes until the edges turn golden but the centers remain soft.
- Add Maltesers: While cookies are still warm, press two Maltesers into the top of each cookie to form the spider bodies.
- Cool Cookies: Let the cookies sit on the baking tray for 10 minutes, then transfer to a wire rack to cool completely.
- Pipe Legs: Fill a small ziplock bag with melted dark chocolate, cut a tiny hole in one corner, and pipe four legs on each side of the Maltesers on each cookie.
- Add Eyes: Use white icing to pipe two dots for eyes on each spider, then add a small dot of melted chocolate in the center of each eye for pupils.
- Set and Serve: Allow the chocolate legs and eyes to harden completely before serving. Store in an airtight container for up to 1 week.
Notes
- Delicious, chewy cookies with a fun chocolate spider on top!
- For firmer cookies, bake a few minutes longer but avoid overbaking to maintain softness.
- Substitute Maltesers with other round chocolates if preferred.
- Store cookies in an airtight container to keep them fresh for up to one week.
Nutrition
- Serving Size: 1 cookie
- Calories: 211
- Sugar: 17g
- Sodium: 156mg
- Fat: 10g
- Saturated Fat: 6g
- Unsaturated Fat: 3g
- Trans Fat: 0g
- Carbohydrates: 28g
- Fiber: 1g
- Protein: 2g
- Cholesterol: 27mg


