
If you’re looking for a fun and festive way to celebrate the spooky season, you’ve got to try this Halloween Donuts Recipe. Trust me, these donuts are an absolute blast to make and even better to eat — and the best part? You don’t need to be a pro baker to pull off some seriously adorable and creepy donut designs. Whether you’re throwing a party or just want a sweet treat with a Halloween twist, this recipe will become your new go-to!
Why You’ll Love This Recipe
- Super Easy Decorating: You don’t have to spend hours decorating to get amazing Halloween vibes on your donuts.
- Perfect for Parties: These donuts come together quickly and delight guests of all ages with fun candy eyes, fangs, and spider accents.
- Use Store-Bought Donuts: No need to bake from scratch — simply grab glazed or chocolate frosted donuts to save time.
- Customizable Colors and Toppings: Mix and match candy melts and sprinkles to make these your own spooky masterpiece.

Ingredients You’ll Need
To make this Halloween Donuts Recipe really shine, you’ll want to have a mix of candy melts, fun toppings, and of course, fresh donuts. I love using a blend of glazed and filled donuts because the flavors and textures play so well together. Here’s a quick rundown of the essentials you’ll want on hand before jumping in.
- Glazed Donuts or Bars: They’re the perfect canvas—soft and sweet with just enough stickiness for coatings.
- Filled Glazed Donuts: Adds variety and extra flavor surprises inside each bite.
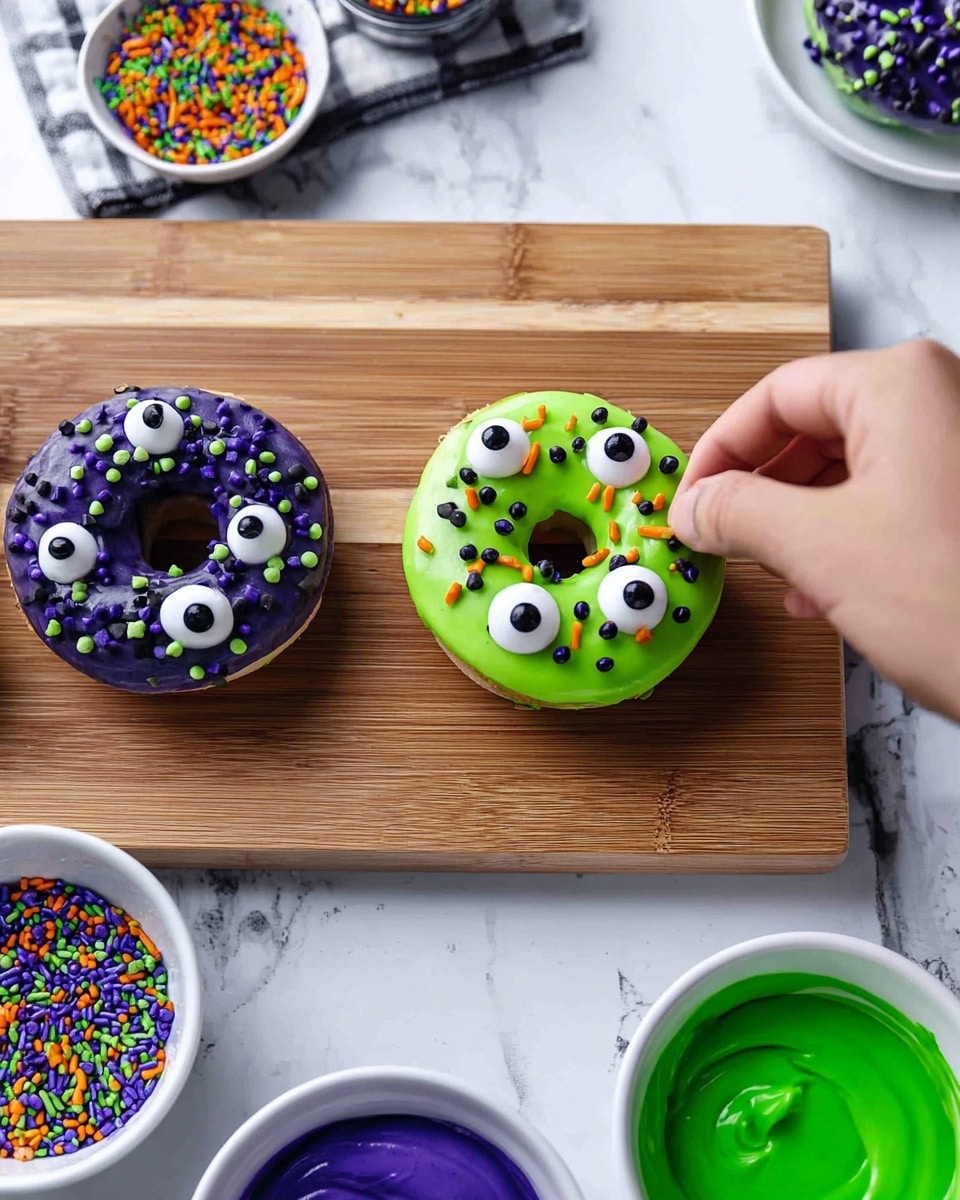
- Purple, Green, and Bright White Candy Melts: These vibrant colors really bring the spooky themes to life—grab good quality melts for smooth coverage.
- Refined Coconut Oil or Shortening: Helps candy melts thin out for easier dipping and a shiny finish.
- Candy Eyes (various sizes): These little guys give the donuts instant personality—stock up!
- Sprinkles of Choice: Choose Halloween-themed shapes or colors to up your decoration game.
- Black Frosting: Essential for creepy spider webs and other dark details.
- Plastic Fangs and Spiders: Add a fun 3D touch that really impresses your guests.
- Piping Bags with Various Tips (#104, #8 or #7mm writing tip, #3): Needed for precise decorating—you’ll find these transform your donut designs.
Variations
One of the best parts about this Halloween Donuts Recipe is how easy it is to tweak to your tastes and what you have in your pantry. I’m all about creative spins, and you’ll love how fun it is to personalize each batch. Here are a few ideas to spark your creativity!
- Gluten-Free Option: I’ve swapped regular donuts for gluten-free glazed donuts and my family barely noticed—they still get that sweet, soft bite that pairs perfectly with candy melts.
- Vegan Candy Melts: Switching to a vegan-friendly candy melt and using a dairy-free frosting works great if you want to keep it plant-based without losing the festive look.
- Classic Pumpkin Spice Twist: Add a light dusting of cinnamon and pumpkin pie spice over the frosted donuts—I swear the spice combo with the candy melts is next-level.
- Non-Filled vs Filled Donuts: If you love cream or jelly-filled donuts, go ahead and use them all; or keep it simple with all glazed for easy decorating.
How to Make Halloween Donuts Recipe
Step 1: Prep Your Workspace and Donuts
Start by lining a baking sheet or two with parchment paper — this makes cleanup super easy and gives your donuts a place to dry after dipping and decorating. Gather your donuts (glazed, filled, or chocolate frosted) and have them ready on the side. This recipe moves fast once the candy melts go into action, so prep everything ahead.
Step 2: Melt Your Candy Coatings
In separate microwave-safe bowls, melt your purple, green, and bright white candy melts. I like to use 20-30 second bursts, stirring well in between to avoid burning. Mix in 2-4 tablespoons of refined coconut oil or shortening with each batch to get a smooth, thin consistency perfect for dipping and drizzling. Think of it like painting your donuts with candy paint!
Step 3: Dip and Decorate Donuts
Now the fun begins! Dip your plain glazed donuts into the white candy melts for a ghostly look or coat filled donuts in the green melts for a monster vibe. Use the sprinkles and candy eyes to create ghoulish faces — I love layering eyes of different sizes for a quirky effect. Add spider webs and details with black frosting using your piping bags, and for the seriously spooky, attach plastic fangs or spiders. Place each donut onto the parchment paper to dry completely.
Step 4: Let Your Creations Set
Give your donuts about 20-30 minutes to fully dry at room temperature. If you’re in a hurry, popping them into the fridge for 10-15 minutes speeds things up without dulling the shine of the candy coating.
Pro Tips for Making Halloween Donuts Recipe
- Don’t Overheat Candy Melts: Melting slowly in short bursts prevents grainy texture and ensures smooth coating every time.
- Use Refined Coconut Oil: It won’t flavor the candy melts and helps keep the coating shiny and thin enough for easy dipping.
- Apply Decorations Quickly: Once dipped, add eyes and sprinkles before the coating sets to help them stick perfectly.
- Avoid Overcrowding the Drying Area: Give each donut space to dry separately to keep decorations intact.
How to Serve Halloween Donuts Recipe
Garnishes
I’m a sucker for a little extra flair, so I love garnishing these donuts with edible glitter or additional sprinkles to make them pop. You can even add a drizzle of red decorating food gel icing for a “bloody” effect — it’s a great way to amp up the spooky factor and impress your guests visually while adding a touch of tangy sweetness.
Side Dishes
I like pairing these donuts with warm apple cider or a rich hot chocolate with marshmallows. It balances the sweetness and keeps the Halloween vibes cozy and inviting. Plus, hot drinks help cut through the richness of the candy coating, so your guests don’t feel overwhelmed.
Creative Ways to Present
Whenever I make these for a party, I display them on a tiered stand with black and orange cupcake wrappers underneath each donut for color contrast. For a fun twist, arrange some plastic spiders or mini pumpkins around the tray to bring the Halloween spirit straight to the table. Kids especially love grabbing donuts out of a “cauldron” set-up — it really adds to the excitement!
Make Ahead and Storage
Storing Leftovers
I usually store leftover donuts in an airtight container at room temperature and they stay fresh for up to two days. The candy coating keeps them protected, but after that, they do start to lose that fresh-dipped shine. Just make sure to keep them away from heat and humidity!
Freezing
Freezing decorated donuts is a bit tricky because the candy coating can crack or get sticky when thawed. If you want to freeze them, wrap each one individually in plastic wrap and store in a single layer in a freezer-safe container. Thaw gently in the fridge, not at room temp, to avoid moisture buildup.
Reheating
I don’t recommend reheating these donuts because the candy melts can melt off and decorations might shift. If you want them warm, a quick 5-7 seconds in the microwave can warm the donut itself but watch closely to keep the decorations intact.
FAQs
-
Can I use homemade donuts for this Halloween Donuts Recipe?
Absolutely! Homemade donuts work wonderfully if you have the time and want to customize flavors. Just make sure the donuts are completely cooled before dipping to avoid melting the candy coating.
-
What if I don’t have candy melts—can I use chocolate instead?
You can use chocolate, but it doesn’t melt as smoothly as candy melts and can be trickier to color. If you want to color homemade chocolate coats, white chocolate with food coloring for candy melts is better for vibrant Halloween colors.
-
How long do Halloween donuts stay fresh?
Stored properly in an airtight container at room temperature, they stay fresh for about 1-2 days. Beyond that, the donuts might dry out or candy coatings may lose their texture.
-
Do I have to use plastic fangs and spiders?
Not at all! They’re optional fun accents, but if you’d rather stick to edible decorations, candy eyes and sprinkles work great to create those Halloween vibes.
Final Thoughts
I absolutely love how this Halloween Donuts Recipe turns out every time — it brings such joy watching friends and family’s faces light up when they see all those goofy eyes and spooky designs. The best part for me is how simple it is to make something that looks so festive without stress. I can’t wait for you to try it and add your own creative twist. Trust me, these donuts will be a hit at your Halloween celebrations and maybe even become an annual tradition. Happy decorating and happy haunting!
Print
Halloween Donuts Recipe
- Prep Time: 10 min
- Cook Time: 20 min
- Total Time: 30 min
- Yield: 36 Donuts
- Category: Dessert
- Method: No-Cook
- Cuisine: American
Description
Celebrate Halloween with these fun and festive Halloween Donuts, featuring a variety of glazed, filled, and chocolate-frosted donuts decorated with colorful candy melts, candy eyes, sprinkles, and spooky accents like plastic fangs and spiders. Easy to assemble and perfect for parties or a seasonal treat.
Ingredients
General Supplies
- 1 or 2 baking sheets lined with parchment paper
- Piping bags
- #104 piping tip
- #8 piping tip (or a 7mm writing tip)
- #3 piping tip
Donut Bases
- ½ Dozen Glazed Donuts or Bars
- ½ Dozen Filled Glazed Donuts
- ½ Dozen Filled Donuts or Bars
- ½ Dozen Glazed Donuts
- ½ Dozen Chocolate Frosted Donuts
Candy Melts and Oils
- 6 oz Purple Candy Melts
- 6 oz Green Candy Melts
- 6 oz Bright White Candy Melts
- 12 oz Bright White Candy Melts
- 2-6 tbsp Refined coconut oil (or shortening), divided as needed
Decorations
- Candy Eyes (various sizes), about 36 total
- Sprinkles of choice
- 12 Candy Eyes
- 1-2 cups Black Frosting
- 6 Plastic Fangs
- 6 Plastic Spiders
- Red Decorating Food Gel Icing
Instructions
- Prepare Work Surface: Line one or two baking sheets with parchment paper to place the decorated donuts on, allowing them to dry without sticking.
- Melt Candy Melts: Gently melt the purple, green, and bright white candy melts in separate bowls with 2-6 tablespoons of refined coconut oil or shortening to achieve a smooth, dip-friendly consistency.
- Decorate Glazed and Filled Donuts: Dip the glazed and filled glazed donuts into the melted purple, green, or white candy melts as desired. Add candy eyes and sprinkles immediately for festive designs.
- Add Black Frosting and Details: Use the black frosting with piping bags fitted with appropriate tips (#104, #8, #3) to pipe spooky faces, spider webs, or other Halloween motifs onto donuts.
- Apply Plastic Decorations: Attach plastic fangs or plastic spiders to the donuts as detailed in the decoration plan, securing them with a small amount of frosting or candy melt.
- Use Red Food Gel Icing: Add accents with red decorating food gel to create blood-like effects or other creepy details on donuts.
- Drying: Place all decorated donuts on the prepared parchment-lined baking sheets and allow them to dry completely so that the candy melts and frosting set firmly before serving.
Notes
- Celebrate the season with Halloween Donuts—soft, sweet, and easy to decorate for a spooky, festive treat.
- You can customize decorations with your favorite Halloween colored sprinkles or candies.
- Adjust the amount of coconut oil to control consistency of candy melts for easier dipping or piping.
- Plastic decorations are non-edible, so remove before eating or warn guests.
- Store decorated donuts in a cool, dry place to prevent melting.
Nutrition
- Serving Size: 1 Donut
- Calories: 200 kcal
- Sugar: 15 g
- Sodium: 180 mg
- Fat: 10 g
- Saturated Fat: 5 g
- Unsaturated Fat: 4 g
- Trans Fat: 0 g
- Carbohydrates: 26 g
- Fiber: 1 g
- Protein: 2 g
- Cholesterol: 15 mg
