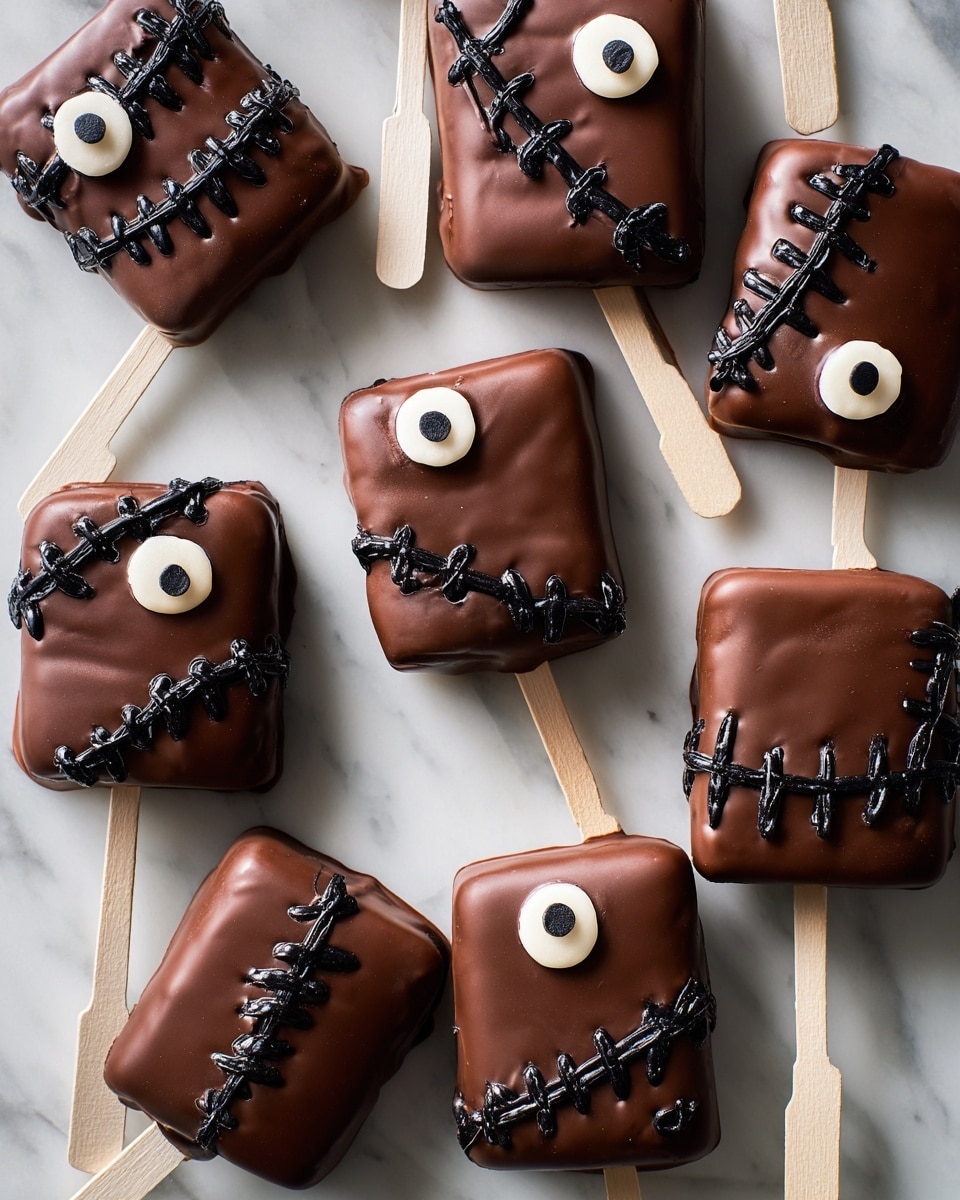
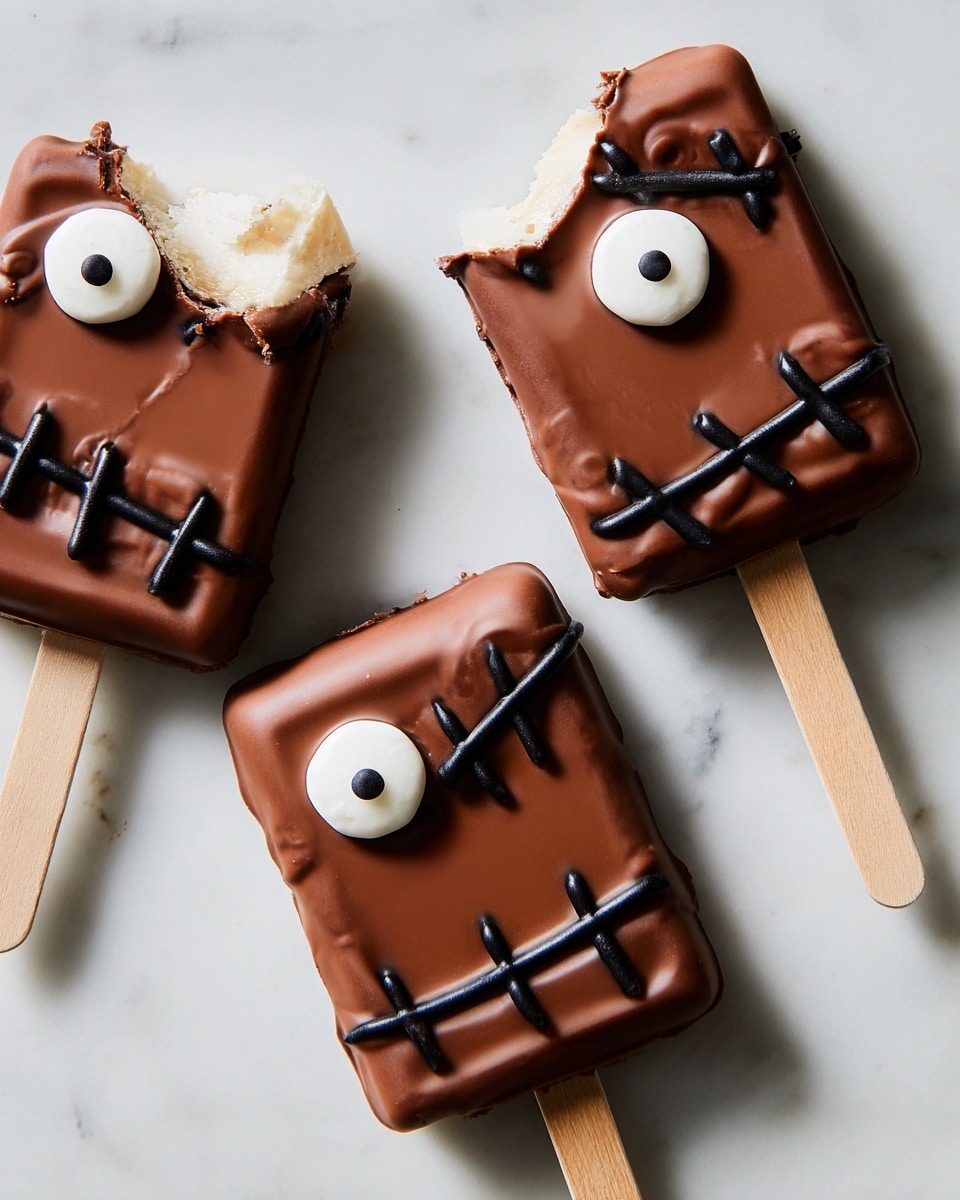
If you’re scouting for a quirky, delightful treat that screams Halloween with every bite, you’re going to adore this Hocus Pocus S’mores Pops Recipe. Trust me, these pops are not just cute—they’re downright addicting. When I first tried making them, I didn’t expect my family to go crazy over a s’mores twist, but here we are, every spooky season. You’ll find that combining graham crackers, marshmallow crème, and chocolate with those playful candy eyes makes dessert time feel like a magical little party. So grab your ingredients and get ready for a fun, easy, and seriously charming recipe that’s perfect for both kids and adults!
Why You’ll Love This Recipe
- Super Simple & Quick: These s’mores pops come together in under 45 minutes, making them perfect for last-minute Halloween parties.
- Crowd-Pleasing Fun: The candy eyes and cookie frosting details turn classic s’mores into an adorable spooky treat your guests will talk about.
- No Oven Needed: Everything sets with chilling and dipping, keeping your kitchen cool and easy.
- Customizable & Creative: You can tweak decorations or chocolate flavors to fit your mood or theme.
Ingredients You’ll Need
These ingredients work in harmony to create that perfect balance between crunch, gooeyness, and chocolatey sweetness. When shopping, look for fresh graham crackers and high-quality semisweet chocolate chips for that unbeatable melt-and-dip magic.
- Graham crackers: Halved to create the perfect sandwich size and sturdy enough to hold the marshmallow crème and chocolate coating.
- Marshmallow crème: This gooey spread replaces traditional marshmallows and makes the pops easier to assemble and eat.
- Semisweet chocolate chips: Choose a good quality brand for smooth melting and rich chocolate flavor.
- Coconut oil: Helps the chocolate melt evenly and gives it a glossy finish once set.
- Candy eyes: These add the fun spooky element—look for slightly bigger sizes for standout eyes.
- Black cookie frosting: For drawing details that bring your Hocus Pocus characters to life.
Variations
I love how flexible this Hocus Pocus S’mores Pops Recipe is—once you’ve mastered the base, you can get really creative! You might want to switch up the type of chocolate or swap candy eyes for other fun decorations. Make it your own!
- White Chocolate or Milk Chocolate: I once dipped mine in white chocolate for a “ghostly” effect—kids loved the creamy sweetness!
- Peanut Butter Twist: Spread a thin layer of peanut butter under the marshmallow crème for a nutty surprise.
- Gluten-Free Option: Use gluten-free graham crackers, which work just as well in this no-bake recipe.
- Vegan Variation: Swap marshmallow crème for a vegan marshmallow spread and choose dairy-free chocolate chips for a plant-based treat.
How to Make Hocus Pocus S’mores Pops Recipe
Step 1: Assemble Your Graham Cracker Sandwiches
Start by spreading about a tablespoon of marshmallow crème on half of your graham cracker halves. Here’s a trick I discovered: spreading the crème evenly but not too thick ensures the sandwich stays neat and the popsicle stick sticks straight. Place a popsicle stick halfway on the creme side, so it peeks out like a handle, then top with the other graham cracker half. Set these assembled sandwiches on a parchment-lined baking sheet and pop them into the freezer to chill while you prepare your chocolate dip—this step keeps everything firm and easier to dip.
Step 2: Melt the Chocolate for Dipping
In a medium heatproof bowl, combine your semisweet chocolate chips with the coconut oil. Microwave in 20-second bursts, stirring well between each, until the mixture is completely melted and silky smooth. This usually takes about a minute total. The coconut oil isn’t just a secret ingredient—it smooths out the chocolate and makes the coating glossy and easier to spread on your graham cracker pops.
Step 3: Dip and Decorate
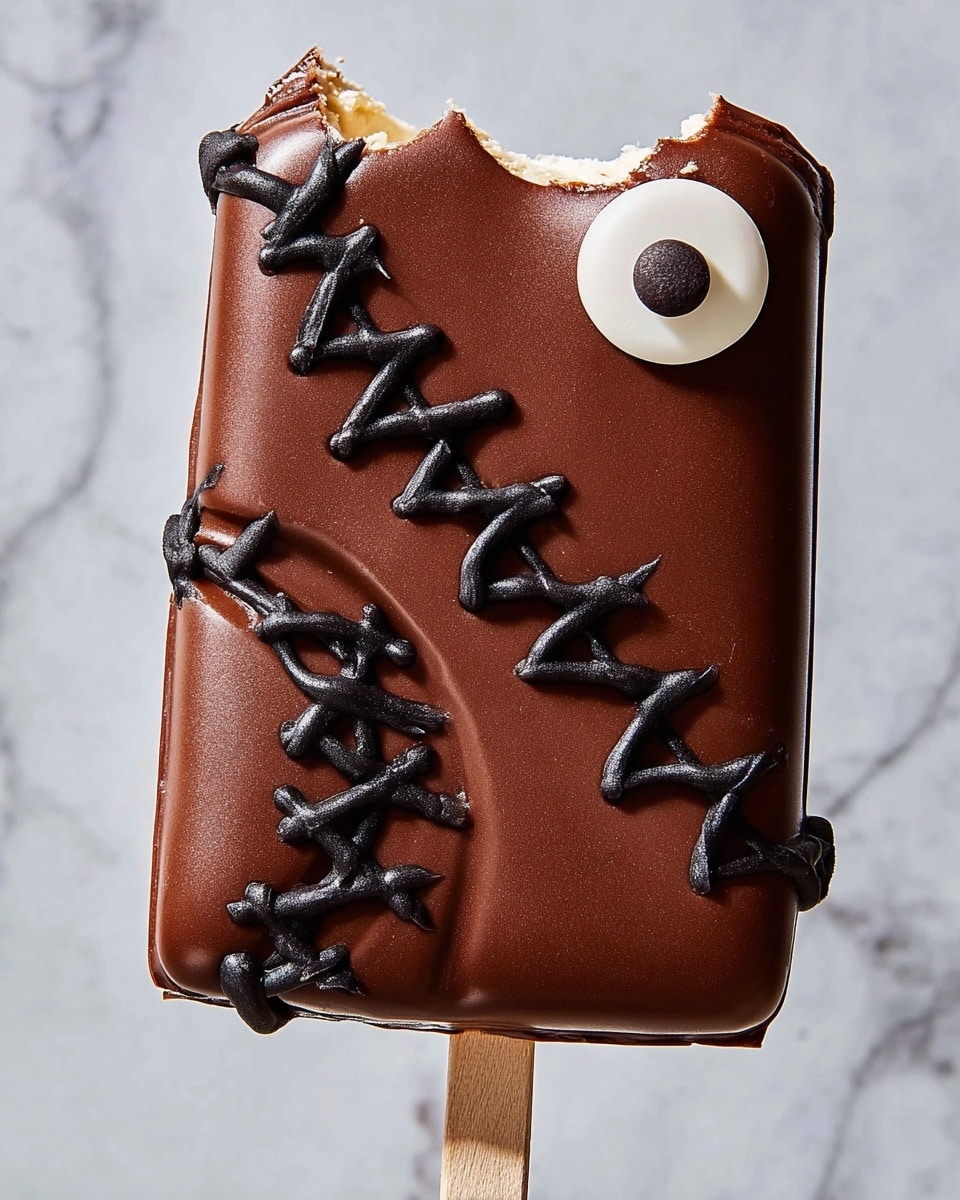
Now comes the fun part! Dip each chilled s’mores sandwich into the chocolate, covering every inch. I like to use a butter knife or a little spatula to swipe the sides and make sure you don’t miss a spot. Then, before the chocolate sets, press one candy eye onto each “book” near the far right side, about halfway down—that’s the magical detail that makes these pops so “alive.” Place the dipped pops back onto the parchment-lined sheet and refrigerate to let the chocolate harden for about 15 minutes.
Step 4: Add the Final Spooky Flourishes
Once the chocolate is set, it’s time to really make these pops pop! Use your black cookie frosting to draw a circle around each candy eye, and then add two semicircles on the outer corners of the graham cracker “book” to resemble spooky glasses. Fancy some creepy stitches? Draw small “X” marks on the chocolate surface to mimic stitches—that little touch makes such a difference. After decorating, refrigerate again for at least 15 minutes so everything sets perfectly.
Pro Tips for Making Hocus Pocus S’mores Pops Recipe
- Chill for Easy Dipping: I learned the hard way that freezing the sandwiches first keeps the marshmallow crème firm and prevents the pops from falling apart during dipping.
- Use Parchment Paper: It saves you from sticky chocolate messes and speeds cleanup — totally worth it.
- Steady Hands for Frosting: Put your black frosting in a piping bag with a fine tip or a plastic bag with a tiny hole cut out for precise decorating.
- Avoid Over-Melting Chocolate: I found microwaving in small bursts and stirring often keeps the chocolate smooth without burning it.
How to Serve Hocus Pocus S’mores Pops Recipe
Garnishes
I like to sprinkle a tiny pinch of edible glitter over the chocolate coating before it fully sets—it adds just a bit of Halloween sparkle that kids adore. If you want to get festive, scatter some crushed candy corn or Halloween-themed sprinkles on top right after dipping.
Side Dishes
This recipe pairs fabulously with warm apple cider or a cozy cup of hot chocolate, especially if you’re serving at a Halloween party or chilly fall night gathering. For something extra fun, a simple popcorn mix with caramel and pretzels is a great savory-sweet match on the side.
Creative Ways to Present
For a Halloween bash, I like to stick these pops upright in a pumpkin or foam block covered with black tissue paper, turning them into an eerie “book” display. Wrapping each pop in cellophane tied with orange and black ribbon makes them perfect party favors, too. You could even set up a make-your-own decorating station for friends and family to personalize their own!
Make Ahead and Storage
Storing Leftovers
These s’mores pops keep beautifully in an airtight container in the refrigerator for up to 3 days. Just make sure they’re well separated or placed in layers with parchment paper to avoid sticking together. I usually stash mine in a single layer on a baking sheet inside the fridge to keep their shape intact.
Freezing
Want to prep your Halloween treats ahead of time? Freeze the prepared pops on a lined tray until firm, then transfer to a freezer-safe container. They freeze well for up to a month. When you’re ready to serve, just thaw them in the refrigerator for a few hours.
Reheating
Since these are best enjoyed cold, I don’t recommend reheating. But if your chocolate loses shine or firmness, brief warmth at room temperature softens them up nicely without losing that gooey texture.
FAQs
-
Can I use regular marshmallows instead of marshmallow crème?
You could, but marshmallow crème spreads more evenly and holds the popsicle stick better. If you use regular marshmallows, try melting them first to spread smoothly and avoid lumps.
-
What if I don’t have candy eyes?
No worries! You can substitute with mini chocolate chips, small round candies, or even pipe eyes with white and black frosting. The key is making the “spooky eye” detail stand out.
-
How do I prevent the pops from falling apart when dipping?
Freezing the assembled graham cracker sandwiches before dipping is your best bet. This firms up the marshmallow crème and prevents the pops from getting soggy or soft while you coat them with chocolate.
-
Can I use other types of chocolate?
Absolutely! Milk, dark, or white chocolate chips all work well. Just keep an eye on melting times and adjust coconut oil amounts slightly if needed to maintain that smooth coating texture.
Final Thoughts
This Hocus Pocus S’mores Pops Recipe has become a staple in my Halloween lineup because it’s as much fun to make as it is to eat. I love how it turns a nostalgic campfire treat into a festive, whimsical party showstopper with minimal fuss. Whether you’re baking with kids or need a last-minute dessert idea, these pops bring smiles and a little magic to every bite. Give them a try—you’ll be so glad you did, and who knows, they might just become your new favorite Halloween tradition too!
Print
Hocus Pocus S’mores Pops Recipe
- Prep Time: 15 min
- Cook Time: 0 min
- Total Time: 45 min
- Yield: 6 pops
- Category: Dessert
- Method: No-Cook
- Cuisine: American
Description
These Hocus Pocus S’mores Pops are a fun and festive Halloween treat, combining classic s’mores flavors with a spooky twist. Perfect for a party, they feature graham cracker sandwiches filled with marshmallow crème, dipped in rich melted chocolate, and decorated with candy eyes and black cookie frosting for a playful and creepy effect.
Ingredients
Graham Cracker Sandwiches
- 12 graham crackers, halved
- 1/2 cup marshmallow crème
- 6 popsicle sticks
Chocolate Coating
- 2 cups semisweet chocolate chips
- 3 tablespoons coconut oil
Decorations
- 1 bag candy eyes
- 1 container black cookie frosting
Instructions
- Prepare Graham Cracker Sandwiches: Spread about 1 tablespoon of marshmallow crème on one half of the graham crackers. Place a popsicle stick halfway onto the marshmallow crème, so it extends out like a handle, then top with the other half of the graham cracker to form a sandwich. Arrange all sandwiches on a parchment-lined baking sheet and freeze while preparing the chocolate coating.
- Melt Chocolate Coating: In a medium heatproof bowl, microwave the semisweet chocolate chips and coconut oil together in 20-second increments. Stir well between each increment until the mixture is completely melted and smooth, approximately 1 minute total.
- Dip Sandwiches in Chocolate: Remove the graham cracker sandwiches from the freezer. Dip each sandwich completely into the melted chocolate, using a butter knife or silicone spatula to ensure the sides are fully coated. Adhere one candy eye onto each chocolate-covered sandwich, positioning it on the far right side about halfway down the graham cracker. Place them back onto the parchment-lined baking sheet and refrigerate until the chocolate hardens, about 15 minutes.
- Decorate with Frosting: Using the black cookie frosting, draw a circle around the candy eye to create a spooky eye effect. Add two semicircles on the outer corners of each graham cracker “book” and draw “stitches” on the chocolate coating to enhance the creepy design.
- Set and Serve: Refrigerate the decorated s’mores pops for at least an additional 15 minutes until the frosting is set. Serve chilled for a festive Halloween treat that’s sure to impress your guests.
Notes
- Looking for an easy Halloween dessert idea? This Hocus Pocus-inspired s’mores pops recipe will be the talk of any Halloween bash.
- Freezing the sandwiches before dipping helps the chocolate set faster and keeps the marshmallow stable during dipping.
- Use a silicone spatula or butter knife to ensure even chocolate coating on all sides.
- Customize your decorations with different colored frosting or additional candy to match your party theme.
Nutrition
- Serving Size: 1 s’mores pop
- Calories: 1065
- Sugar: 120 g
- Sodium: 302 mg
- Fat: 56 g
- Saturated Fat: 29 g
- Unsaturated Fat: 27 g
- Trans Fat: 0 g
- Carbohydrates: 143 g
- Fiber: 8 g
- Protein: 7 g
- Cholesterol: 0 mg

