
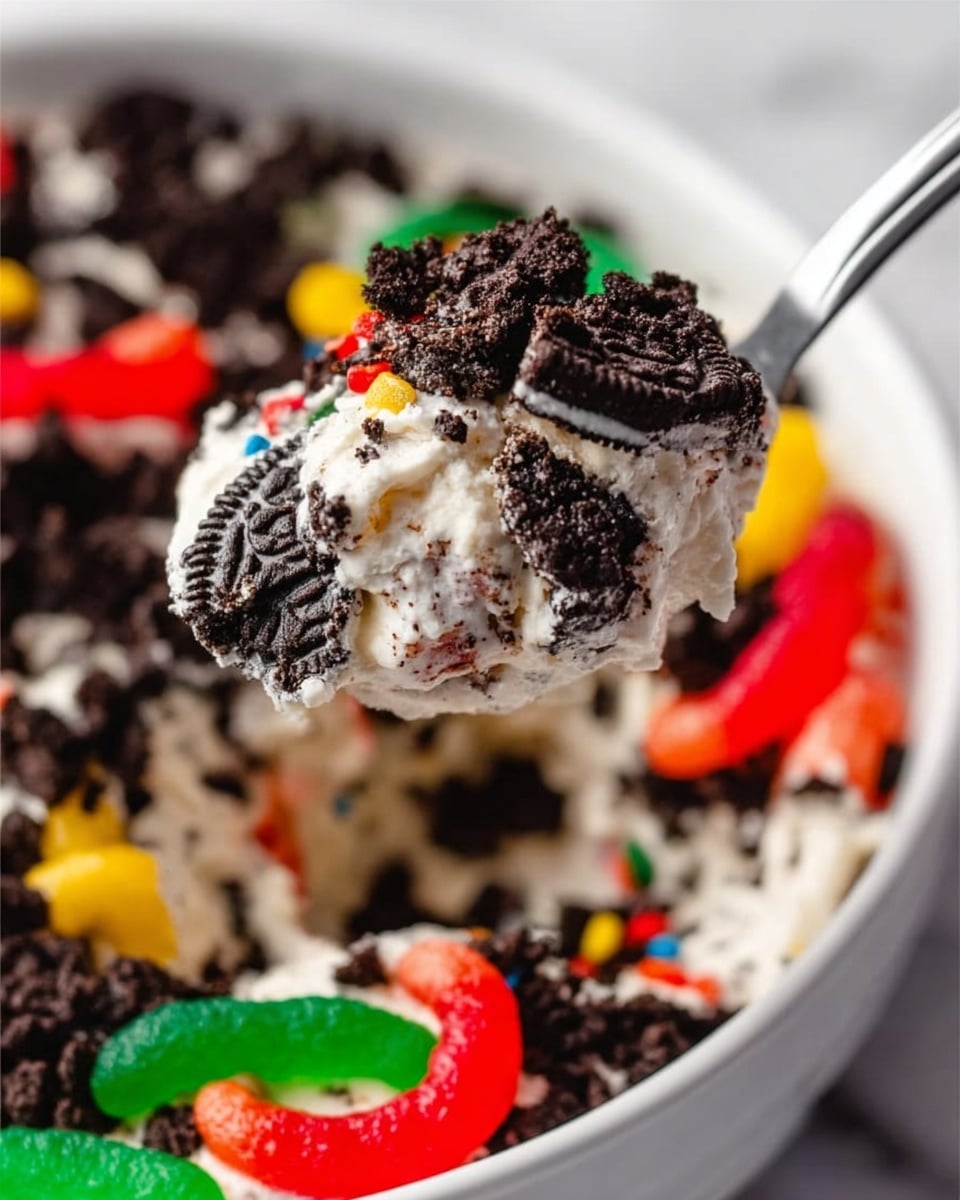
If you’ve never made a Dirt Pudding Recipe before, you’re in for such a treat. This fun, nostalgic dessert is basically layers of creamy vanilla pudding, luscious cream cheese filling, and crushed Oreos that look—and taste—like delicious dirt. I absolutely love this recipe because it’s super simple, no-bake, and always a huge hit whether I’m making it for family dinner or a kid’s birthday party. Stick around, and I’ll walk you through all my tips so you can nail it on your first try!
Why You’ll Love This Recipe
- Easy and No-Bake: You don’t need an oven, which means zero fuss and tons of fun layering.
- Kid-Approved: My family goes crazy for this, especially the gummy worms on top!
- Perfect Texture: Mixing big and small Oreo crumbs gives this dessert a fantastic dirt-like look and crunch.
- Make-Ahead Friendly: This dessert tastes even better after chilling overnight, so you can prep ahead for easy entertaining.

Ingredients You’ll Need
The magic behind this Dirt Pudding Recipe lies in the creamy pudding and tangy cream cheese combined with the rich Oreo crumb layers. I always recommend getting whole Oreos for the best texture and a high-quality instant pudding for creamy consistency.
- Oreos: Crushing a mix of bigger chunks and fine crumbs gives the perfect dirt effect—plus so much flavor.
- Salted butter: Melting the butter and tossing the Oreos in it helps the crumbs stick together and adds richness.
- Milk: Whole or 2% works best for that creamy pudding base.
- Instant French vanilla pudding mix: This adds the signature creamy, sweet vanilla flavor that balances the Oreos perfectly.
- Cream cheese: Softened to room temp, it adds a tangy smoothness that I think really elevates the dessert.
- Powdered sugar: Sweetens and smooths the cream cheese mixture without any graininess.
- Whipped topping: Folding this in gives the pudding a light, airy texture that’s irresistible.
- Gummy worms (optional): Because what’s dirt without worms? Fun for serving, especially for kids!
Variations
I love how flexible this Dirt Pudding Recipe is—you can easily make it your own with a few tweaks. Play around with flavors or even texture, and let your creativity run wild!
- Chocolate pudding: I’ve swapped French vanilla for chocolate pudding when I’m craving something richer—my family was surprisingly wild about it!
- Different cookies: Sometimes I use chocolate chip cookies or Golden Oreos for a twist on the classic look and taste.
- For a lighter version: Use fat-free pudding and light whipped topping, and reduce the butter slightly.
- Adding nuts or candy: Crushed peanuts or mini chocolate chips mixed in add crunch and fun surprises.
How to Make Dirt Pudding Recipe
Step 1: Crush your Oreos like a pro
Start by placing the Oreos in a large ziplock bag and sealing it tight. Grab a rolling pin and crush the cookies, but here’s what I discovered: leaving some chunks bigger than others adds a more natural “dirt” texture that’s just so satisfying to bite into. Once crushed, pour in the melted salted butter and shake the bag gently to coat every crumb—this trick browns the crumbs slightly and makes them richer. If you prefer, you can use a food processor, but be careful not to pulverize everything into dust!
Step 2: Whisk together pudding and milk
In a mixing bowl, whisk the milk and both boxes of instant French vanilla pudding mix together. It thickens quickly—usually in about two minutes—and this step is key to getting a smooth base layer for your dirt pudding. Once it starts setting, set it aside while you prepare the cream cheese mixture.
Step 3: Beat the cream cheese and powdered sugar
Using an electric mixer, beat the softened cream cheese and powdered sugar on medium-high speed until the mixture is perfectly smooth with no lumps. I’ve tried mixing by hand before, and trust me, it’s worth taking a few extra minutes here to get a silky finish—otherwise, you might notice gritty bits in the finished dessert.
Step 4: Fold pudding and whipped topping together
Next, add the pudding mixture to your cream cheese blend, mixing on low speed until just combined—don’t overbeat or the texture can get a bit dense. Then, gently fold in the whipped topping with a spatula until everything is light and fluffy. This step makes the dirt pudding irresistibly creamy.
Step 5: Build your layers
If you’re using a large container (an 8-inch tall pail works great), flip the container’s lid upside down and place it in the bottom to make the dessert shorter—this helps the layers reach the very top, which looks so beautiful. Start with a layer of the pudding mixture, then add a layer of Oreo crumbs. Repeat until you use all the pudding and crumbs, finishing with a top layer of Oreos. If you want, tuck some gummy worms in on top for that classic “earthy” look!
Step 6: Chill for the perfect finish
Refrigerate the entire dirt pudding for at least 4 hours, but I highly recommend overnight. It’s amazing how the flavors marry together during that time—the pudding firms up a bit and the Oreo crumbs soften just enough, making the texture dreamy. It’s the best no-fail way to serve a crowd-pleaser every time.
Pro Tips for Making Dirt Pudding Recipe
- Mix Oreo Sizes: Leaving bigger chunks of Oreo adds a better “dirt” texture, so don’t crush them all to dust like I used to!
- Use Room Temp Cream Cheese: It whips up smoother and blends nicely without lumps, improving texture significantly.
- Chill Overnight: The flavor and texture are miles better the day after you make it, so plan ahead if you can.
- Don’t Overmix Pudding: Folding it in gently keeps it light, so avoid beating too hard or it can get dense.
How to Serve Dirt Pudding Recipe
Garnishes
I always top mine with gummy worms—it’s such a fun, whimsical touch that kids and adults both love. If you want to be extra, you can add mini chocolate chips, edible flowers, or even a sprinkle of crushed nuts for some contrast. I’ve found that a little creativity in garnishes adds to the presentation and gets everyone excited to dig in.
Side Dishes
This dessert is pretty rich, so I like serving it alongside a light fruit salad or fresh berries to balance out the sweetness. A simple glass of cold milk or iced coffee works perfectly, too, especially for summer gatherings.
Creative Ways to Present
One of my favorite presentation ideas is serving the Dirt Pudding Recipe in individual mason jars—everyone gets their own portion, which is great for parties. For a kid’s birthday party, I’ve even hidden gummy “treasures” like mini candies inside the layers for a fun discovery. You can also layer it in a clear trifle bowl to show off those beautiful dirt and pudding stripes.
Make Ahead and Storage
Storing Leftovers
I store my leftover dirt pudding tightly covered with plastic wrap or in an airtight container in the fridge. It lasts beautifully for up to three days—just give it a little stir before serving if the layers have settled. I actually find it tastes even better after a day or two as the flavors meld.
Freezing
I wouldn’t recommend freezing this Dirt Pudding Recipe because the texture of the pudding and whipped topping can get grainy or icy after thawing. If you want to stash it ahead, just make it fully and chill in the fridge instead.
Reheating
This dessert is best served cold and doesn’t require reheating. If it’s been in the fridge a while, just pull it out 10 minutes before serving to take the chill off slightly for the best flavor and texture experience.
FAQs
-
Can I make Dirt Pudding Recipe dairy-free?
Yes! You can substitute dairy-free cream cheese, use a non-dairy milk like almond or oat milk, and swap the whipped topping for a coconut whipped cream. Just be sure your instant pudding mixes are also dairy-free or find vegan alternatives.
-
What’s the best way to crush Oreos for Dirt Pudding Recipe?
I recommend using a ziplock bag and rolling pin so you can control the size of the crumbs yourself. Stop crushing once you have a mix of crumbs and some bigger chunks—this gives the best texture.
-
Can this dessert be made gluten-free?
Absolutely! Just swap regular Oreos for gluten-free sandwich cookies and verify that your pudding mixes don’t contain gluten ingredients. The rest of the ingredients are naturally gluten-free.
-
How long can I store Dirt Pudding in the fridge?
It keeps well for about three days when covered tightly and refrigerated. After that, the pudding texture might start to degrade.
-
Can I add other mix-ins to the pudding?
Yes! Some of my favorite additions include mini chocolate chips, chopped nuts, or even crushed candy bars layered between the pudding and cookie crumbs.
Final Thoughts
I hope after sharing this Dirt Pudding Recipe with you, you’ll feel excited to try it out and maybe even customize it to your own liking. For me, this dessert brings back so many wonderful memories—whether it’s making it with my kids or sharing it with friends. It’s easy, crowd-pleasing, and downright delicious, which is why it’s a recipe I keep coming back to over and over. Give it a shot—you might just find it becomes your new favorite too!
Print
Dirt Pudding Recipe
- Prep Time: 30 minutes
- Cook Time: 0 minutes
- Total Time: 4 hours 30 minutes
- Yield: 15 servings
- Category: Dessert
- Method: No-Cook
- Cuisine: American
Description
This Dirt Pudding Recipe is a fun and delicious dessert featuring creamy vanilla pudding layered with crushed Oreos and topped with whipped topping and optional gummy worms. Ideal for parties or family gatherings, it combines smooth, sweet pudding and crunchy Oreo crumbs to create a nostalgic and delightful treat that’s sure to please all ages.
Ingredients
Oreo Crust
- 18 – 19 oz. Oreos
- 6 Tablespoons salted butter (melted)
Pudding Mixture
- 3 1/2 cups milk (whole or 2%)
- 2 boxes instant French vanilla pudding (3.4 oz each)
Cheesecake Layer
- 8 oz. cream cheese (softened to room temperature)
- 1 cup powdered sugar
Whipped Topping
- 12 ounces whipped topping (thawed)
Toppings (Optional)
- Gummy worms
Instructions
- Crush the Oreos: Place Oreos in a large ziplock bag and seal tightly. Use a rolling pin to crush them into a mixture of larger and smaller crumbs, avoiding pulverizing completely. Pour melted butter into the bag and shake well to combine. Set aside. Alternatively, you can use a food processor to crush the Oreos.
- Prepare the pudding: In a bowl, whisk together the milk and instant French vanilla pudding mix until the mixture begins to thicken, about 2 minutes. Set aside to start setting up.
- Make the cream cheese mixture: In the bowl of an electric mixer, beat the softened cream cheese and powdered sugar on medium-high speed until smooth and free of lumps.
- Combine pudding and cream cheese: Fold the pudding mixture into the cream cheese mixture, beating on low speed until fully combined. Then gently stir in the thawed whipped topping until the mixture is smooth and homogeneous.
- Assemble the dirt pudding: If using a large serving pail (8 inches tall or more), place the whipped topping lid upside down at the bottom to shorten the pail and allow the pudding to fill it completely. Begin layering by spreading a layer of the pudding mixture on the bottom, then a layer of the Oreo crumb mixture on top. Repeat the layering until all pudding and Oreo crumbs are used, finishing with a final layer of Oreo crumbs on top.
- Add final touches and chill: Arrange gummy worms on top as decoration if desired. Cover the pudding and refrigerate for at least 4 hours or ideally overnight to allow flavors to meld and pudding to fully set before serving.
Notes
- Creamy vanilla pudding paired with crumbled Oreos creates a beloved, nostalgic dessert enjoyed by both kids and adults.
- Using a mix of Oreo crumb sizes adds textural interest to the layers.
- Softened cream cheese ensures a smooth, lump-free mixture for the pudding base.
- Chilling overnight improves the flavor and texture of the final dessert.
- Optional gummy worms add a playful, colorful decoration perfect for themed parties or kids’ events.
Nutrition
- Serving Size: 1 serving
- Calories: 416 kcal
- Sugar: 40 g
- Sodium: 335 mg
- Fat: 21 g
- Saturated Fat: 11 g
- Unsaturated Fat: 8 g
- Trans Fat: 0.2 g
- Carbohydrates: 53 g
- Fiber: 1 g
- Protein: 5 g
- Cholesterol: 35 mg
