
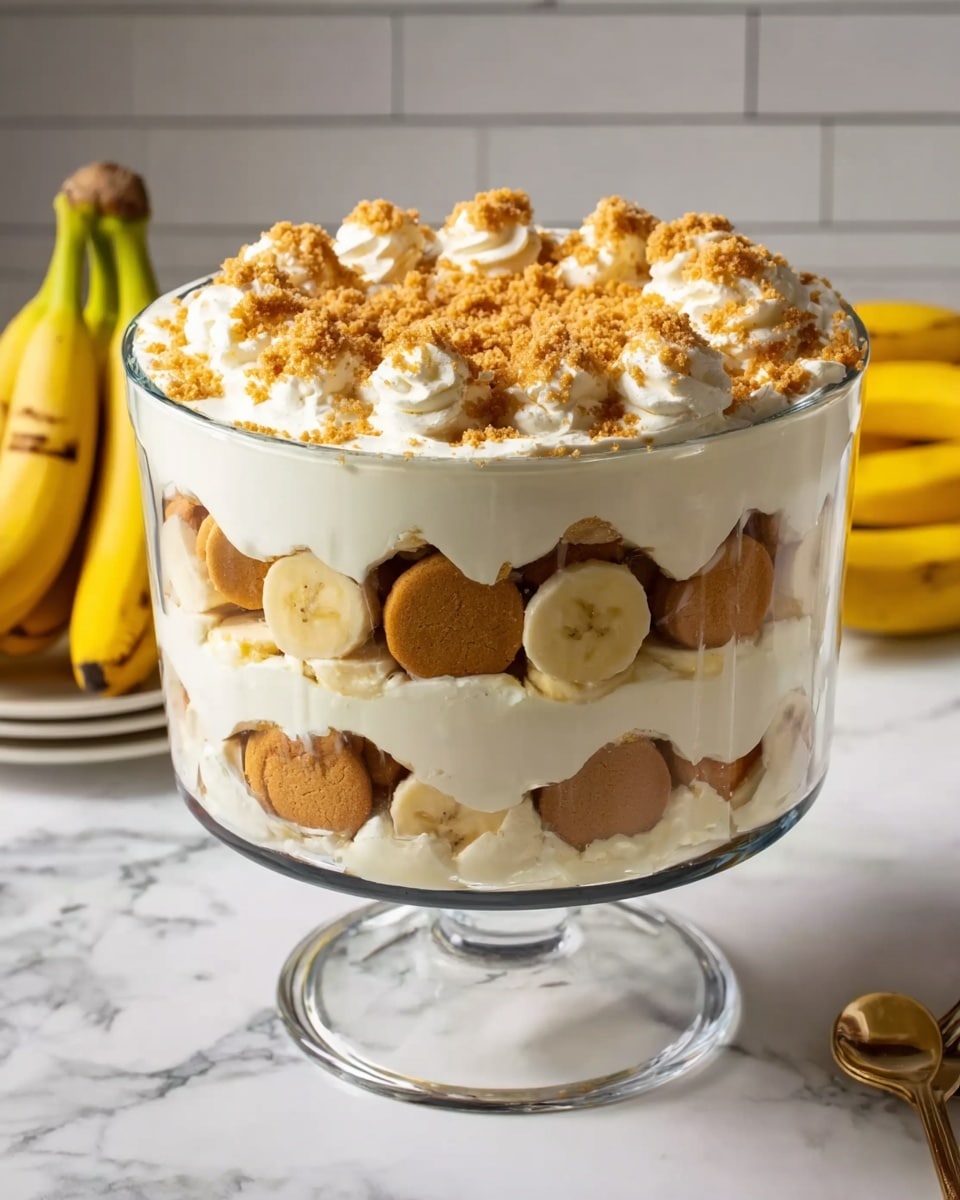
If you’re craving a dessert that feels like a warm hug from your childhood but with a fresh, homemade twist, this Nilla Wafer Banana Pudding with Homemade Vanilla Bean Whipped Cream Recipe is absolutely the one to try. What sets this banana pudding apart is the luscious, silky pudding made from scratch and the dreamy vanilla bean whipped cream you’ll whip up fresh—no canned whipped topping involved! It’s perfect for family gatherings, potlucks, or whenever you want to treat yourself to a classic Southern comfort dessert that truly sings.
I love making this pudding because it transforms simple ingredients into a showstopper. You’ll find that layering soft bananas with crunchy Nilla Wafers and the rich pudding is like a little piece of heaven in every bite. Plus, the vanilla bean whipped cream adds that extra-special touch that makes this recipe a go-to in my kitchen, especially when I want to impress without overcomplicating things.
Why You’ll Love This Recipe
- From-Scratch Pudding: Crafting the pudding yourself means a creamy texture and fresh, natural flavor that store-bought mixes just can’t match.
- Vanilla Bean Whipped Cream: Using real vanilla beans lifts this dessert to a gourmet level, adding a fragrant, unmistakable warmth.
- Classic Meets Elevated: The nostalgic Nilla wafers and bananas stay true to the original, but the homemade elements make it something special.
- Make-Ahead Friendly: It tastes even better the next day, so prepare it in advance to wow your guests with ease.

Ingredients You’ll Need
You’ll want to gather fresh, quality ingredients for this Nilla Wafer Banana Pudding with Homemade Vanilla Bean Whipped Cream Recipe, especially the vanilla beans and ripe bananas—they make all the difference in flavor. Shopping tip: look for firm yet ripe bananas for the best texture.
- Eggs: Fresh large eggs give the pudding its rich body and silky texture.
- Granulated Sugar: Sweetens the pudding perfectly without overpowering.
- All-purpose Flour: Acts as a gentle thickening agent to keep everything smooth.
- Kosher Salt: Just a pinch balances flavors beautifully.
- Milk (2% recommended): Provides creaminess without being too heavy.
- Pure Vanilla Extract: Adds depth and classic vanilla warmth to the pudding.
- Sweetened Condensed Milk: Amplifies sweetness and contributes to a luscious mouthfeel.
- Heavy Cream: The base for the whipped cream—make sure it’s cold for best results.
- Powdered Sugar: Sweetens the whipped cream lightly and helps it hold its shape.
- Vanilla Bean Pods: Scrape out the tiny seeds for an authentic vanilla flavor that you’ll notice with every bite.
- Nilla Wafers: The iconic crunchy layers that soften just right after chilling.
- Bananas: Four large ones sliced thin add natural sweetness and freshness.
Variations
One of the things I adore about this Nilla Wafer Banana Pudding with Homemade Vanilla Bean Whipped Cream Recipe is how flexible it is; you can easily tailor it to your tastes or dietary needs. Feel free to experiment—whether you amp up the vanilla, swap in different cookies, or go dairy-free.
- Swap Cookies: I sometimes use homemade vanilla shortbread or gingersnaps for a spiced twist—my family loves the warm notes it adds.
- Dairy-Free Version: Use coconut milk and coconut cream instead—and try a dairy-free whipped topping for a tropical flair.
- Extra Boozy: For an adult version, a splash of banana liqueur or rum in the pudding adds depth.
- Fruit Mix-In: Adding fresh strawberries or raspberries along with bananas makes for a colorful surprise.
How to Make Nilla Wafer Banana Pudding with Homemade Vanilla Bean Whipped Cream Recipe
Step 1: Whisk Eggs and Prep the Pudding Base
Start by cracking your eggs into a medium bowl and whisking them until smooth. In a large saucepan over medium heat, whisk together the sugar, flour, and salt, then gradually pour in the milk while whisking to keep it lump-free. Heat this mixture gently, stirring often so it thickens and just starts bubbling—this is your pudding base coming to life! Lower the heat and cook for another couple of minutes to set the texture. This step can feel a bit delicate; the key is patience and steady stirring to avoid lumps.
Step 2: Temper the Eggs and Combine
Now comes a little culinary magic called tempering—slowly ladle a bit of that hot milk mixture into the eggs while whisking vigorously. This prevents scrambled eggs and ensures a silky pudding. Then pour the egg mixture back into the saucepan and bring it to a gentle boil again, whisking constantly for two more minutes. Remove it from heat and stir in your vanilla extract. Let the pudding cool for about 15 minutes, giving it a stir every now and then so it cools evenly and won’t form a skin.
Step 3: Add Sweetened Condensed Milk and Cool to Room Temperature
Once the pudding has cooled a bit, fold in the sweetened condensed milk carefully—this adds richness and sweetness that makes the pudding irresistible. After mixing, allow the pudding to come down to room temperature; this is crucial before mixing in whipped cream to keep everything smooth and fluffy.
Step 4: Whip the Vanilla Bean Whipped Cream
In your stand mixer fitted with a whisk, combine cold heavy cream, powdered sugar, and all those beautiful vanilla bean seeds you scraped from the pods. Whip on high until you see stiff peaks form—this means your cream will hold shape and fold nicely into the pudding. You’re going to love how the flecks of vanilla bean look and taste here.
Step 5: Fold and Layer Your Banana Pudding
Gently fold about half of the whipped cream into your cooled pudding until just combined, then repeat with the remaining half—this preserves a light, airy texture. In a large trifle dish or individual cups, layer a base of Nilla Wafers, then a generous layer of sliced bananas, followed by your pudding mixture. Repeat these layers, finishing with a layer of pudding on top. Cover and refrigerate overnight—this step is vital as the wafers soften and all those flavors meld together beautifully.
Step 6: Garnish and Serve
Right before serving, crush a handful of extra Nilla Wafers and sprinkle them atop for a delightful crunch contrast. I’ve found this last touch adds texture that makes the dessert even more fun to enjoy.
Pro Tips for Making Nilla Wafer Banana Pudding with Homemade Vanilla Bean Whipped Cream Recipe
- Temper Eggs Carefully: Always add the hot milk mixture slowly to eggs while whisking to prevent curdling—trust me, rushing this step can ruin the texture.
- Use Real Vanilla Beans: I learned this trick the hard way; vanilla bean seeds add flavor and an elegant look that extract just can’t replicate.
- Chill Overnight: Resist the urge to serve too soon—the pudding needs time to soak in flavors and soften the wafers for that perfect mouthfeel.
- Fold, Don’t Stir: When mixing whipped cream, fold gently to keep it light and fluffy rather than deflating your dessert.
How to Serve Nilla Wafer Banana Pudding with Homemade Vanilla Bean Whipped Cream Recipe
Garnishes
I keep it simple with crushed Nilla Wafers on top for crunch, but sometimes I add a sprinkle of toasted chopped pecans for a nutty twist. A few fresh banana slices or a dusting of cinnamon can elevate the look if you want something a bit fancier for guests. These little extras make the pudding feel thoughtfully garnished without overwhelming its classic charm.
Side Dishes
This banana pudding stands well on its own as a sweet finale, but pairing it with a light cup of coffee or a scoop of coconut sorbet is a match made in heaven. At casual get-togethers, a simple fruit salad or some buttery biscuits alongside balance the richness nicely without stealing focus from the pudding itself.
Creative Ways to Present
For a party, try scooping the pudding into individual glass jars or mini trifle cups—layers look stunning through the glass and guests love having their own portion. Alternatively, build a layered trifle in a large glass bowl that lets everyone see those beautiful vanilla bean flecks and layers of wafers and bananas. I’ve also made this in mason jars for giftable desserts—just tie on a ribbon and you’re good to go!
Make Ahead and Storage
Storing Leftovers
Leftover banana pudding stores beautifully in an airtight container in the fridge. I usually cover it tightly because the pudding can pick up fridge odors otherwise. The texture holds up well for up to 3 days, though bananas might brown slightly—if that happens, just stir gently before serving.
Freezing
I personally avoid freezing this pudding because the whipped cream and bananas don’t freeze well—they can separate or get watery. If you must freeze, try freezing the pudding alone without the bananas and wafers, then assemble fresh when thawed.
Reheating
This pudding is best served chilled, so reheating isn’t really recommended. However, if you want to warm it slightly, do so gently in the microwave for just a few seconds, making sure not to melt the whipped cream topping. Otherwise, let it thaw fully in the fridge before serving.
FAQs
-
Can I use instant pudding mix instead of making pudding from scratch?
You could, but I really recommend making the pudding from scratch in this recipe—it results in a richer, creamier texture that instant mixes just can’t match. Plus, you get the satisfaction of homemade flavor that’s customizable with real vanilla bean and fresh ingredients.
-
How ripe should the bananas be for this pudding?
Look for bananas that are ripe but still firm—yellow with just a few brown spots. Too green and they’ll be hard and tart; too ripe and they can become mushy after layering, which changes the texture of your pudding.
-
Can I prepare this pudding a few hours before serving?
Yes, but I encourage you to prepare it the day before whenever possible. This gives the wafers time to soften and flavors to meld, creating that signature creamy, indulgent texture everyone loves.
-
What if I don’t have vanilla bean pods—can I skip them?
You can, but the vanilla bean seeds add a unique aroma and visual appeal. If you don’t have pods, increase the vanilla extract slightly to compensate, but know it’s not quite the same sensation.
Final Thoughts
This Nilla Wafer Banana Pudding with Homemade Vanilla Bean Whipped Cream Recipe holds a special place in my heart—it’s that perfect blend of nostalgia and homemade goodness that everyone seems to adore. I’ve found it’s the kind of dessert that brings people together, sparking smiles and second helpings without fail. If you want to impress with a dessert that’s both comforting and a bit fancy, give this one a try—you won’t regret it, and I promise your friends and family will be begging for your recipe!
Print
Nilla Wafer Banana Pudding with Homemade Vanilla Bean Whipped Cream Recipe
- Prep Time: 15 minutes
- Cook Time: 15 minutes
- Total Time: 1 hour 30 minutes
- Yield: 8 – 10 servings
- Category: Dessert
- Method: Stovetop
- Cuisine: Southern American
Description
This Nilla Wafer Banana Pudding recipe is a classic Southern dessert reinvented with a smooth, creamy homemade pudding, layered with fresh banana slices and crisp Nilla Wafers. Enhanced with vanilla bean whipped cream and sweetened condensed milk, it offers a perfect balance of rich flavors and textures. Ideal for make-ahead gatherings, the pudding sets overnight for a luscious, crowd-pleasing treat.
Ingredients
Pudding Ingredients
- 3 large eggs
- 3/4 cup granulated sugar
- 1/4 cup all-purpose flour
- 1/4 teaspoon kosher salt
- 3 cups milk (preferably 2%)
- 1 teaspoon pure vanilla extract
- 1 (14-ounce) can sweetened condensed milk
Whipped Cream
- 1 1/3 cups heavy cream, cold
- 6 tablespoons powdered sugar
- Seeds from 2 vanilla bean pods, split and scraped
Assembly
- 1 (8-ounce) box Nilla Wafers
- 4 large bananas, cut into 1/4 inch slices
Instructions
- Make pudding: In a medium bowl, whisk the eggs until smooth. In a large saucepan over medium heat, combine the sugar, flour, and salt; then gradually whisk in the milk. Cook the mixture, stirring occasionally, until it starts to thicken and bubble. Lower the heat to low and continue cooking for 2 more minutes.
- Temper eggs: Remove the saucepan from heat. Slowly pour a small amount of the hot milk mixture into the whisked eggs, whisking constantly to prevent curdling. Pour the tempered egg mixture back into the saucepan, whisking continuously.
- Cook pudding: Return the saucepan to medium heat and bring the mixture back to a gentle boil. Reduce the heat to low and cook while stirring for another 2 minutes until thickened. Remove from heat and stir in the vanilla extract. Let cool for 15 minutes, stirring occasionally.
- Incorporate condensed milk: Fold the sweetened condensed milk into the pudding gently, then continue cooling the pudding to room temperature.
- Make whipped cream: In the bowl of a stand mixer fitted with a whisk attachment, combine the cold heavy cream, powdered sugar, and vanilla bean seeds. Beat on high speed until stiff peaks form.
- Combine pudding and whipped cream: Gently fold the whipped cream into the cooled pudding in two additions until fully incorporated without deflating.
- Assemble the dessert: In a large trifle dish or similar serving bowl, layer Nilla Wafers (reserve some for topping), banana slices, and pudding alternately.
- Chill: Cover the assembled pudding and refrigerate overnight to allow flavors to meld and pudding to set.
- Serve: Just before serving, crush the reserved Nilla Wafers and sprinkle them on top for added texture and garnish.
Notes
- Romel Bruno recreates a childhood favorite with a gourmet spin: banana pudding.
- Use ripe but firm bananas to avoid mushiness.
- Allowing the pudding to chill overnight improves the texture and flavor blending.
- For extra flavor, you can toast the crushed Nilla Wafers on top before serving.
- If fresh vanilla beans are unavailable, substitute with 1 1/2 teaspoons pure vanilla extract in the whipped cream.
Nutrition
- Serving Size: 1 cup
- Calories: 320
- Sugar: 30g
- Sodium: 160mg
- Fat: 15g
- Saturated Fat: 9g
- Unsaturated Fat: 5g
- Trans Fat: 0g
- Carbohydrates: 40g
- Fiber: 2g
- Protein: 5g
- Cholesterol: 110mg


