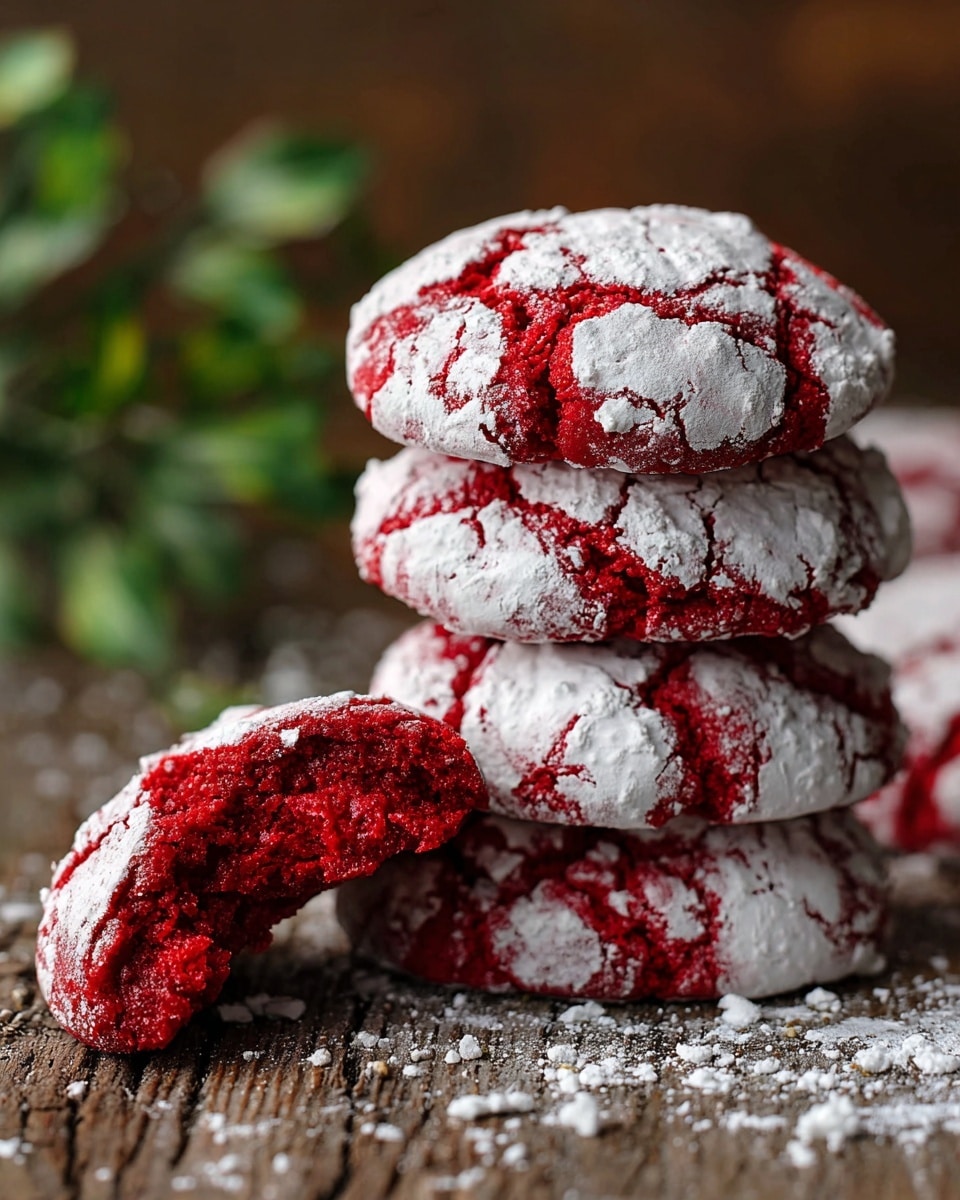
If you’re on the hunt for a Red Velvet Cookies Recipe that’s a total game-changer, you’re in the right spot. I absolutely love how these cookies turn out — soft, chewy, with just the perfect hint of cocoa cut through by that classic red velvet tang. They work beautifully when you want something richer than a typical cookie but easier to throw together than a full cake.
When I first tried this recipe, I was blown away by how the vinegar and cocoa dance together, giving it that authentic red velvet flavor without being overly sweet. You’ll find that they’re perfect for cozy afternoons, gifting during the holidays, or just sneaking one (or two) during your coffee break. Trust me, this Red Velvet Cookies Recipe will quickly become your go-to for special occasions or anytime you need a little comfort in cookie form.
Why You’ll Love This Recipe
- Simple Ingredients: You probably have most of them in your pantry already, making it super easy to whip up.
- Perfect Texture: Chewy with a slight crisp on the outside, which is just irresistible.
- Flavor Balance: The vinegar and cocoa combo give a subtle tang that’s classic red velvet at its best.
- Great for Gifting: These cookies look impressive but are surprisingly effortless to make.

Ingredients You’ll Need
The magic in this Red Velvet Cookies Recipe comes from a blend of everyday baking staples combined with a few special touches that bring out the best texture and flavor. Using unsweetened cocoa powder instead of melted chocolate keeps the batter light, and the olive oil adds a unique moistness you wouldn’t expect.
- Granulated sugar: Sweetens just right and helps with that chewy texture we’ll love.
- Unsalted butter: Room temperature butter creamed with sugar creates the perfect base for fluffiness.
- Extra-virgin olive oil: Adds a subtle richness and keeps cookies moist; don’t worry, it won’t taste oily.
- Large egg: Binds everything together and adds tenderness.
- Kosher salt: Enhances all the flavors, balancing sweetness and cocoa.
- Red food coloring: This gives the iconic red velvet pop; feel free to tweak the amount to your preferred shade.
- Vinegar: Any kind except balsamic works; it brightens flavors and reacts with baking soda for that lift.
- Pure vanilla extract: Adds warmth and depth — don’t skip this!
- All-purpose flour: Creates structure without weighing the cookies down.
- Unsweetened cocoa powder: Gives that classic chocolate undertone without overpowering.
- Baking soda: Leavens for a light, tender crumb.
- Powdered sugar: For dusting and the perfect final touch of sweetness and texture.
Variations
I love making this Red Velvet Cookies Recipe my own by swapping out a few ingredients or adding extras depending on the occasion. Feel free to experiment — the base dough is forgiving, so you can tweak it to your taste buds’ delight!
- Add white chocolate chips: My family goes crazy for these — the white chocolate chunks add bursts of creamy sweetness.
- Use almond extract: I once added a teaspoon instead of vanilla, and it gave a lovely nutty hint without overpowering the red velvet flavor.
- Make it vegan: Swap the butter for vegan alternatives and use flax egg instead of the real egg; just expect a slight texture variation.
- Sprinkles for fun: For birthdays, I toss colorful sprinkles into the dough for a festive twist.
How to Make Red Velvet Cookies Recipe
Step 1: Mix the wet ingredients until fluffy
Start by preheating your oven to 350°F (180°C). In a large bowl or stand mixer fitted with the paddle attachment, cream together the granulated sugar, softened butter, olive oil, egg, and kosher salt. I like to mix on medium speed until the mixture is fluffy and a pale yellow, which usually takes about 3-4 minutes. This step is crucial because it builds that light, tender base for our cookies.
Step 2: Add the colors and flavors
Next, stir in the red food coloring, vinegar, and vanilla extract until everything is evenly combined. This is where the cookie starts developing that signature red velvet flavor. Don’t skip the vinegar — it’s a subtle secret that brightens the dough and helps react with the baking soda later on.
Step 3: Combine the dry ingredients
In a separate bowl, whisk together the all-purpose flour, unsweetened cocoa powder, and baking soda. I love taking a moment here to sift these ingredients—it helps prevent any lumps and makes for an evenly textured cookie.
Step 4: Gently fold in the dry mix
Sprinkle the dry mixture over the wet ingredients and fold carefully until just combined. Be careful not to overmix here because I used to get tough cookies, but light folding keeps them soft and tender. The dough will be slightly sticky — that’s normal!
Step 5: Chill, shape, and coat
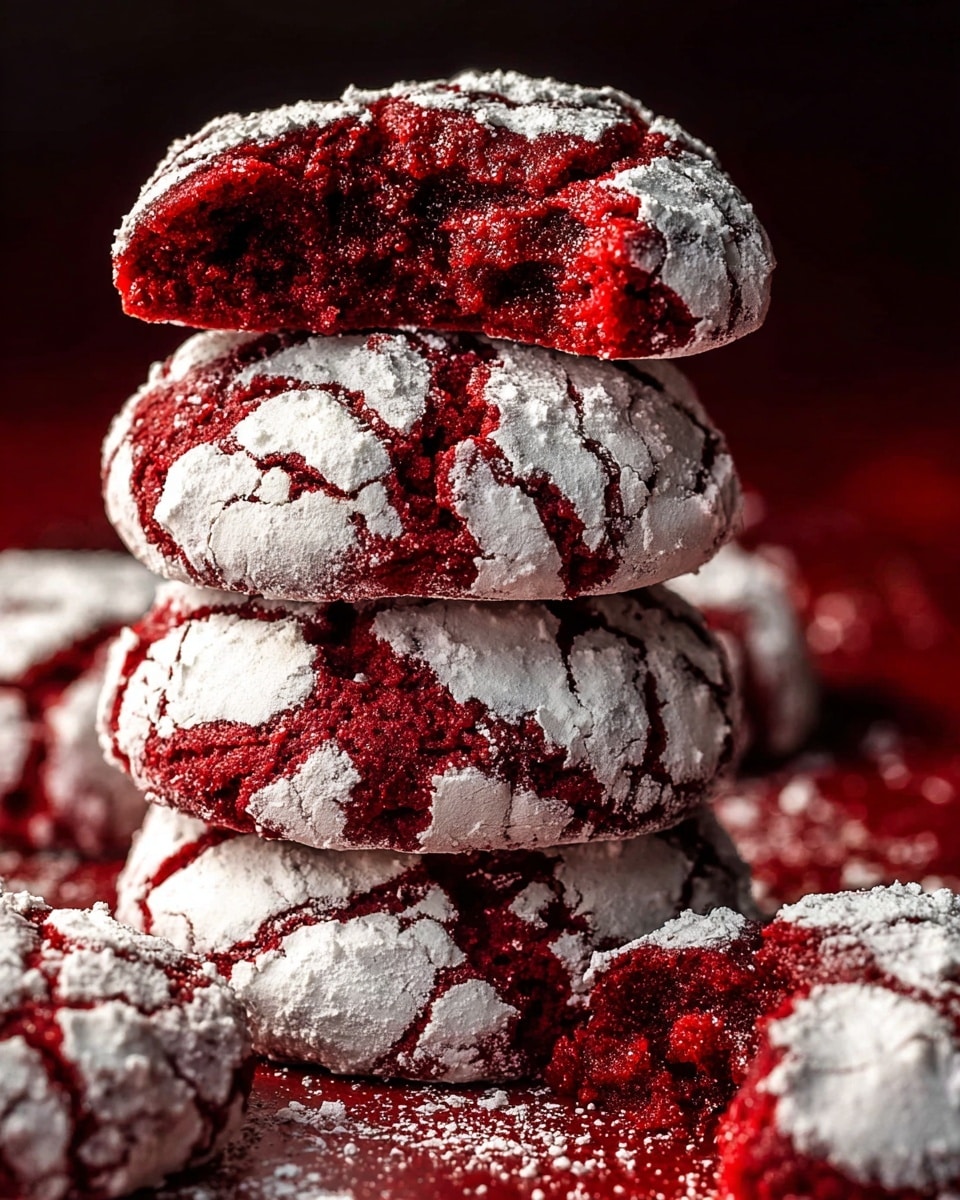
Using a medium ice cream scoop, portion out the dough onto a plate (you should make about 8 cookies). Pop them into the freezer for 10 minutes — this chilling step helps prevent spreading too much in the oven. After chilling, roll each dough ball between your hands to make them smooth, then toss them generously in powdered sugar to fully coat the outsides. This coating gives the cookies their classic crackled, sugary finish.
Step 6: Bake and enjoy
Arrange the coated cookies on a half sheet pan lined with parchment paper, leaving some space between each. Bake for about 20 minutes until the edges are set but the centers remain soft. Once out of the oven, let them cool a bit before moving to a container—or, let’s be honest, eat right off the pan while they’re still warm!
Pro Tips for Making Red Velvet Cookies Recipe
- Chill Dough Thoroughly: Freezing dough balls helps control spread and keeps the cookies thick—don’t skip this step.
- Use Fresh Baking Soda: I’ve learned that old baking soda leads to flat cookies, so always check your expiry dates.
- Don’t Overmix: Fold the flour mixture just until combined to keep those cookies melt-in-your-mouth tender.
- Coat Generously in Powdered Sugar: This adds that signature crackly texture and gorgeous look that’s oh-so Instagramable.
How to Serve Red Velvet Cookies Recipe
Garnishes
I usually keep it simple with a generous dusting of powdered sugar, but for a special treat, a little drizzle of white chocolate or a few sprinkles make these cookies pop. Sometimes I add a tiny dollop of cream cheese frosting between two cookies for an indulgent sandwich version — trust me, it’s worth the extra effort!
Side Dishes
Pair these cookies with a cup of rich coffee, hot chocolate, or a glass of cold milk. I find that the contrast with a creamy drink makes each bite feel even more decadent. They’re also delightful alongside fresh berries or a scoop of vanilla ice cream if you want to elevate dessert time.
Creative Ways to Present
For parties, I like to arrange the Red Velvet Cookies Recipe on a platter with sprigs of fresh mint and edible flowers for a pop of color. Another fun idea is stacking them in a mason jar layered with parchment paper, then tied with a ribbon — it makes a darling gift. You can also turn them into festive sandwich cookies by adding cream cheese frosting or marshmallow fluff in between.
Make Ahead and Storage
Storing Leftovers
I keep my leftover cookies in an airtight container at room temperature, and they stay chewy and fresh for about 3 days. If you notice they start to dry out, popping them in the microwave for 10-15 seconds softens them right up again.
Freezing
I’ve had great success freezing the cookie dough balls before baking — just freeze them on a tray then transfer to a zip-top bag. When you want fresh cookies, bake straight from frozen, adding a couple of extra minutes to the baking time. Fully baked cookies freeze well too; just wrap tightly to prevent freezer burn.
Reheating
To reheat, I pop cookies in a 300°F (150°C) oven for 5 minutes or microwave them briefly. This revives that fresh-baked softness and keeps the powdered sugar coating from melting off. It’s the perfect quick fix when you want that warm, comforting cookie feeling again.
FAQs
-
Can I use a different type of food coloring for this Red Velvet Cookies Recipe?
Absolutely! You can use gel or liquid food coloring, but gel tends to give a more vibrant color with less liquid added, which helps keep the dough consistency perfect. Just adjust the amount slightly and add it slowly to get your preferred shade of red.
-
Why do I add vinegar to red velvet cookies?
The vinegar interacts with the baking soda to create a chemical reaction that produces carbon dioxide, which helps leaven the cookies and gives them a tender crumb. Plus, it enhances that classic red velvet tang without leaving any vinegary taste behind.
-
Can I make this recipe dairy-free?
Yes! You can replace the butter with a plant-based vegan butter and use an egg substitute like a flax egg. Keep in mind the texture might be a bit different, but it’s a great option if you’re avoiding dairy.
-
How do I prevent my Red Velvet Cookies from spreading too much?
Chilling the dough balls before baking is key. This cools the fats, slows down spreading, and results in thicker, chewier cookies. Also, make sure your baking soda is fresh and avoid overmixing the dough, which can break down the structure.
Final Thoughts
This Red Velvet Cookies Recipe is one I keep coming back to because it’s reliable, delicious, and just a little bit special without being complicated. I love sharing these with friends and family — they always ask for the recipe! If you’re looking for a cookie that brings that full red velvet experience but in a quick cookie form, this is the one to try. I’m excited for you to give it a whirl and make it your own because honestly, they’re that good.
Print
Red Velvet Cookies Recipe
- Prep Time: 30 Minutes
- Cook Time: 20 Minutes
- Total Time: 50 Minutes
- Yield: 8 cookies
- Category: Dessert
- Method: Baking
- Cuisine: American
Description
These Red Velvet Cookies are a delightful twist on classic red velvet cake, offering a soft and tender texture with a rich cocoa flavor and a vibrant red color. Perfectly sweetened and dusted with powdered sugar, these cookies deliver a festive treat ideal for any occasion.
Ingredients
Wet Ingredients
- 1 1/4 cup (250 grams) granulated sugar
- 4 tablespoon (1/2 stick or 57 grams) unsalted butter, room temperature
- 3 tablespoon extra-virgin olive oil
- 1 large egg
- 1 tablespoon red food coloring
- 1 tablespoon vinegar (any kind will do, like red, white, rice, and apple cider; just not balsamic)
- 1 teaspoon pure vanilla extract
- 1 teaspoon kosher salt
Dry Ingredients
- 1 3/4 cup (219 grams) all-purpose flour
- 1/4 cup (21 grams) unsweetened cocoa powder
- 1/2 teaspoon baking soda
For Finishing
- Powdered sugar, for dusting
Instructions
- Preheat Oven: Heat the oven to 350°F (180°C) to prepare for baking the cookies.
- Cream Wet Ingredients: In a large bowl or stand mixer fitted with paddle attachment, cream together the sugar, room temperature butter, olive oil, egg, and kosher salt until the mixture is fluffy and pale yellow. Add the red food coloring, vinegar, and vanilla extract, mixing well to combine all the wet ingredients thoroughly.
- Mix Dry Ingredients: In a separate medium bowl, whisk together the all-purpose flour, unsweetened cocoa powder, and baking soda to ensure even distribution. Gently fold the dry mixture into the wet ingredients until just incorporated, avoiding overmixing to keep the dough tender.
- Shape & Chill Dough: Using a medium ice cream scoop, portion out the cookie dough onto a plate (expecting about 8 cookies). Freeze the scooped dough for 10 minutes to help it firm up. After chilling, roll each dough scoop into a ball with your hands, then toss each ball thoroughly in powdered sugar to coat the exterior.
- Bake Cookies: Arrange the sugared dough balls on a half sheet pan, spaced evenly. Bake for 20 minutes in the preheated oven. Once done, allow the cookies to cool before transferring to a container or enjoying them fresh off the pan.
Notes
- The vinegar can be any type except balsamic; apple cider works well for added flavor.
- Freezing the dough before baking helps maintain the shape and texture of the cookies.
- Rolling the cookies in powdered sugar adds a lovely sweet crust and festive appearance.
- Do not overmix the dough to keep the cookies soft and tender.
- Make sure butter is at room temperature for easier creaming and smooth dough consistency.
Nutrition
- Serving Size: 1 cookie
- Calories: 210 kcal
- Sugar: 18 g
- Sodium: 170 mg
- Fat: 12 g
- Saturated Fat: 5 g
- Unsaturated Fat: 6 g
- Trans Fat: 0 g
- Carbohydrates: 26 g
- Fiber: 1 g
- Protein: 2 g
- Cholesterol: 28 mg

