
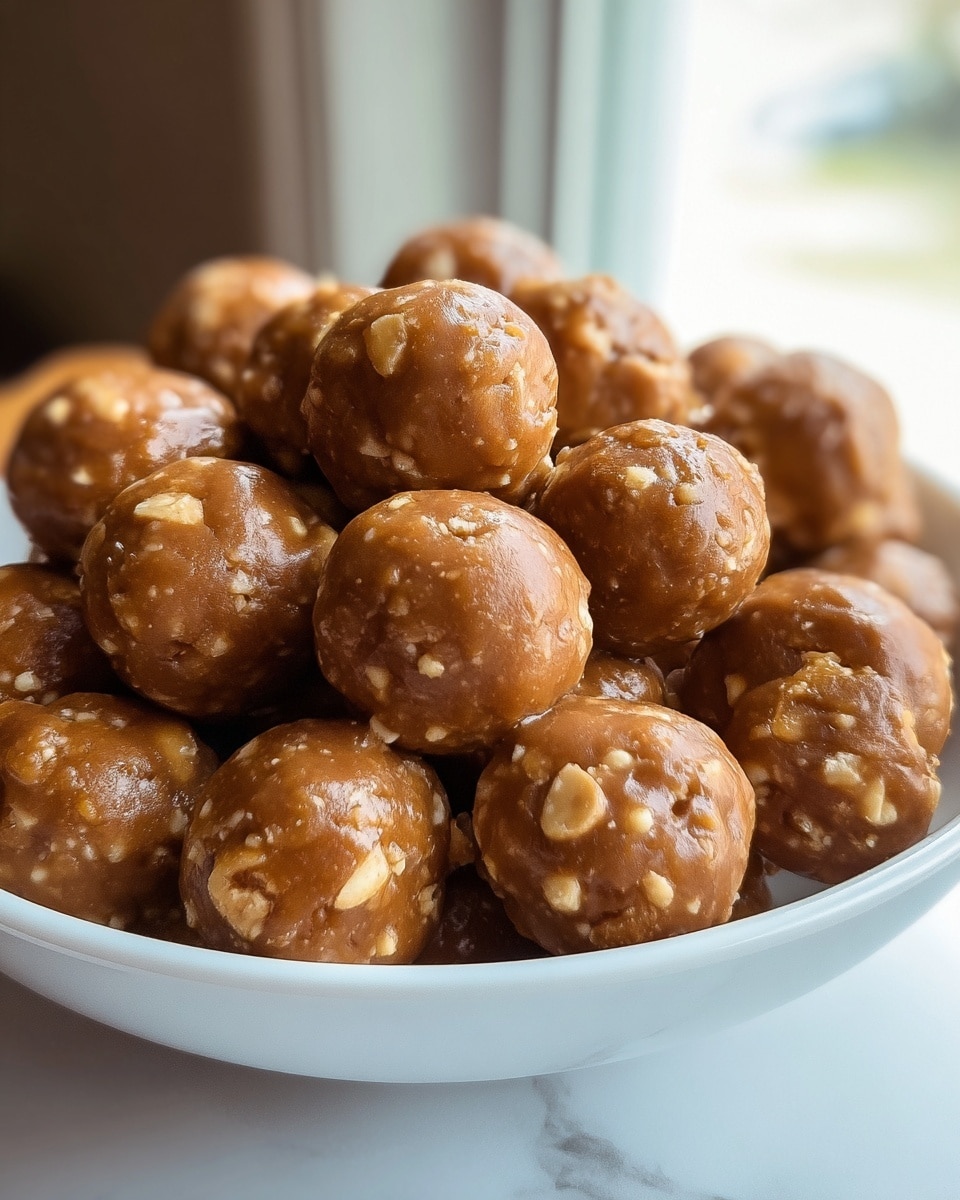
You absolutely have to try this Butterfinger Balls Recipe: A Quick and Easy Delight Recipe—it’s one of those no-fail treats that always impresses without any fuss. I first made these when I needed a last-minute dessert for a family gathering, and honestly, they disappeared faster than I could put them on the plate. The creamy peanut butter mixed with crunchy, buttery Butterfinger bits creates a texture that’s just pure heaven.
What I love about this recipe is how effortlessly you can whip it up and make it your own. Whether you’re craving a cozy snack or need a sweet treat for a party, these Butterfinger balls deliver that perfect balance of rich, sweet, and crunchy. Trust me, once you try this Butterfinger Balls Recipe: A Quick and Easy Delight Recipe, you’ll be making it on repeat.
Why You’ll Love This Recipe
- Quick and Simple: You can have these delightfully rich balls ready in under an hour, perfect for busy days.
- Textural Bliss: The combination of creamy peanut butter and crunchy Butterfinger pieces keeps your bite interesting every time.
- Make-Ahead Friendly: Freeze the balls ahead of time and have a ready-to-go treat whenever you want.
- Kid-Approved: My family absolutely goes crazy for these little gems, and I bet yours will too.

Ingredients You’ll Need
Each ingredient in this Butterfinger Balls Recipe: A Quick and Easy Delight Recipe plays a specific role in balancing creaminess, sweetness, and crunch. I recommend choosing a smooth peanut butter that’s rich and creamy—not the natural, separated kind—so the texture comes out just right.
- Butter: Softened, to blend smoothly with peanut butter and give richness.
- Vanilla Extract: A little warmth and depth that elevates the flavor.
- Peanut Butter: Use classic creamy varieties like Jif or Skippy for perfect consistency.
- Powdered Sugar: Sweetens and thickens the mixture, ensuring the balls hold shape.
- Graham Cracker Crumbs: Adds a subtle crunch and a touch of nostalgic flavor.
- Crushed Butterfinger Bars: The star ingredient—adds that iconic candy crunch and buttery flavor.
- Chocolate Bark or Chips: For dipping and coating; I love using milk chocolate, but dark chocolate works well if you prefer bittersweet.
- Optional Toppings: Extra crushed Butterfingers, festive sprinkles, or coarse sea salt to add a finishing touch.
Variations
I love making this Butterfinger Balls Recipe: A Quick and Easy Delight Recipe my own by switching up coatings or tweaking textures. Don’t be afraid to experiment—it’s part of the fun! Here are a few ways I’ve personalized the recipe.
- Nut-Free Version: I swapped peanut butter for sunflower seed butter once for a school party, and it was a hit with kids who have allergies.
- Double Chocolate: Try mixing in mini chocolate chips into the base or drizzle dark chocolate over the set balls for an extra chocolate punch.
- Spiced Up: Adding a pinch of cinnamon or espresso powder to the mix brings out a whole new flavor dimension I didn’t expect but adored.
- Half-Dipped: For a fun, modern look, dip only half the ball in chocolate and sprinkle toppings on the dipped side.
How to Make Butterfinger Balls Recipe: A Quick and Easy Delight Recipe
Step 1: Cream the Butter and Peanut Butter
Start off by softening your butter to room temperature—it’ll blend so much easier that way. Using a hand or stand mixer, cream together the butter and peanut butter until you have a smooth, uniform mixture. I like to stop and scrape down the sides of the bowl as needed here to make sure everything blends evenly. Then, add the vanilla extract and mix just until combined.
Step 2: Add Powdered Sugar, Crumbs, and Butterfinger Crunch
Slowly add your powdered sugar at a low mixer speed—this prevents a sugar cloud and ensures you don’t overload the motor. Scraping the bowl is key here too. Next, gently fold in the graham cracker crumbs and crushed Butterfinger bars. You want everything well incorporated, but those Butterfinger pieces should remain crunchy and distinct. This texture contrast is what makes this Butterfinger Balls Recipe: A Quick and Easy Delight Recipe so addictive.
Step 3: Roll into Balls and Chill
Line a baking sheet with parchment paper so your balls don’t stick. Using a tablespoon or cookie scoop, portion out the mixture and roll each into a smooth ball with your hands. You might find your hands get sticky—if so, dampen them slightly with water to help. Space the balls a bit apart since we’ll be dipping them later. Into the freezer they go for about 30 minutes or until they’re firm enough to dip without falling apart.
Step 4: Melt the Chocolate
Put your chocolate bark or chips in a microwave-safe bowl and melt in 30-second bursts at 50% power, stirring in between. You want your chocolate silky and smooth, so take your time here to avoid overheating, which can cause seizing. I discovered this trick after struggling with burnt chocolate—patience really pays off!
Step 5: Dip, Decorate, and Set
Using a fork or dipping tool, dunk each chilled ball into the melted chocolate so it’s fully or partially coated. Quickly top with additional crushed Butterfinger pieces, sprinkles, or a pinch of coarse sea salt before the chocolate hardens. Let the dipped balls set at room temperature or pop them back in the fridge for faster setting.
Pro Tips for Making Butterfinger Balls Recipe: A Quick and Easy Delight Recipe
- Use Room Temperature Butter: It blends seamlessly with peanut butter, making the base silky without lumps.
- Choose Classic Peanut Butter: Natural peanut butter tends to separate and can affect the texture of your balls.
- Freeze Before Dipping: This keeps the balls from breaking apart when you coat them with warm chocolate.
- Don’t Overheat Chocolate: Melting at 50% power and stirring frequently prevents burning and ensures a smooth dip coating.
How to Serve Butterfinger Balls Recipe: A Quick and Easy Delight Recipe
Garnishes
I love topping these Butterfinger balls with a sprinkle of crushed candy bars that match the inside—they look festive and add an extra crunch. Sometimes, I add a pinch of flaky sea salt to balance out the sweetness, especially when using dark chocolate. Festive sprinkles make these perfect for parties or holidays, and kids adore how colorful they get!
Side Dishes
These buttery balls are such a rich treat I usually serve them alongside fresh fruit like sliced apples or berries to cut through the sweetness. They also pair wonderfully with a cup of coffee or a cold glass of milk—trust me, that combo is unbeatable. For a party, I like to set them next to simple finger sandwiches or cheese platters for a fun sweet-savory contrast.
Creative Ways to Present
I’ve had so much fun arranging these Butterfinger Balls Recipe: A Quick and Easy Delight Recipe on tiered dessert trays for birthdays and showers. A drizzle of extra chocolate or a decorative dusting of powdered sugar gives them a fancy touch that honestly makes guests think I spent all day in the kitchen. For holidays, arranging them in the shape of a wreath or lining them up in cupcake liners for gifting always gets rave reactions.
Make Ahead and Storage
Storing Leftovers
I store leftover Butterfinger balls in an airtight container in the fridge, layering parchment paper in between if I’m stacking them. They stay fresh and firm for up to a week, which gives you plenty of time to enjoy. Just bring them to room temperature before serving for the best taste and texture.
Freezing
If you want to make these ahead of time, freezing is a lifesaver. I put the balls on a baking sheet first to freeze solid, then transfer them into freezer bags or containers to keep their shape. They freeze wonderfully for up to 3 months, making them perfect for holiday prepping or surprise treats.
Reheating
You don’t really need to reheat these balls since they’re best enjoyed chilled or at room temperature. If your fridge has made the chocolate too hard, just let them sit on the counter for 10-15 minutes so the chocolate softens slightly without melting. This way, you keep that lovely chocolate snap and creamy interior.
FAQs
-
Can I use natural peanut butter for this recipe?
While you can technically use natural peanut butter, I recommend sticking with creamy, non-natural kinds like Jif or Skippy. Natural peanut butter tends to separate and might make the dough too oily or crumbly, which affects the texture and how well the Butterfinger balls hold together.
-
What if I don’t have Butterfinger bars? Can I substitute?
Butterfinger bars provide a unique crunchy, buttery texture, but if you can’t find them, try crushed peanut butter cups or even chopped toffee pieces. The flavor will be a bit different but still delicious. Just make sure whatever you use holds up well in the mixture for that satisfying crunch.
-
How should I melt chocolate without a microwave?
If you don’t have a microwave, use a double boiler method by placing a heatproof bowl over a pot of simmering water, stirring the chocolate until smooth. Just be careful that no water touches the chocolate, or it might seize. This method actually gives great control over melting.
-
Can I make these gluten-free?
Absolutely! To make this Butterfinger Balls Recipe: A Quick and Easy Delight Recipe gluten-free, swap the graham cracker crumbs for gluten-free versions or crushed gluten-free cookies. Just be sure any other ingredients like chocolate or toppings are gluten-free certified.
Final Thoughts
This Butterfinger Balls Recipe: A Quick and Easy Delight Recipe really holds a special place in my kitchen repertoire. It’s the kind of treat that feels both nostalgic and indulgent, impressive yet straightforward to make, and perfect for sharing with loved ones. Honestly, I often find myself making these just to brighten up an ordinary day or surprise my family with something fun. Give this recipe a go—you’ll be so glad you did, and I can almost guarantee it’ll become one of your favorites to pull out time and again.
Print
Butterfinger Balls Recipe: A Quick and Easy Delight Recipe
- Prep Time: 20 minutes
- Cook Time: 0 minutes
- Total Time: 50 minutes
- Yield: 24 balls
- Category: Dessert
- Method: No-Cook
- Cuisine: American
Description
Butterfinger Balls are a quick and easy no-bake treat combining creamy peanut butter, buttery graham cracker crumbs, and crunchy crushed Butterfinger bars, all coated in rich melted chocolate. Perfect for snack time or holiday gifts, these bite-sized delights offer a sweet, crunchy, and chocolatey experience that’s simple to make and freeze for later enjoyment.
Ingredients
Base Ingredients
- 4 tablespoons butter, softened
- 1 teaspoon vanilla extract
- 1 cup peanut butter (avoid all-natural varieties that separate)
Sweeteners and Crunch
- 1 cup powdered sugar
- 3/4 cup graham cracker crumbs
- 1/2 cup crushed Butterfinger bars
Coating and Toppings
- 8 ounces chocolate bark or chocolate chips for coating
- Optional: extra crushed Butterfinger bars, festive sprinkles, coarse sea salt for topping
Instructions
- Mix the Base: In a large bowl, use a hand or stand mixer to cream together the peanut butter and softened butter until smooth. Add the vanilla extract and mix until fully combined.
- Add Sweetness and Crunch: Gradually mix in the powdered sugar at low speed, scraping down the sides of the bowl as needed. Fold in graham cracker crumbs and crushed Butterfinger bars until the mixture is evenly blended.
- Form the Balls: Line a baking sheet with parchment paper. Scoop about 1 to 1½ tablespoons of the dough and roll it into balls. Place the balls spaced apart on the prepared sheet.
- Chill to Set: Freeze the formed balls for 30 minutes or until they are completely firm and easy to dip.
- Melt the Chocolate: In a microwave-safe bowl, melt the chocolate bark or chips in 30-second intervals at 50% power, stirring between intervals until smooth. Take care not to overheat the chocolate to maintain a glossy finish.
- Dip and Decorate: Dip each chilled ball into the melted chocolate—either fully or halfway depending on preference. Immediately top with additional crushed Butterfinger pieces, sea salt, or festive sprinkles before the chocolate hardens.
- Let Them Set: Allow the chocolate coating to harden completely at room temperature or refrigerate briefly before serving or storing.
Notes
- Use regular peanut butter (such as Jif or Skippy) for the best consistency, as natural peanut butters can separate and affect texture.
- For a richer chocolate flavor, opt for dark chocolate chips or bark when coating.
- These treats freeze beautifully, making them perfect for preparing ahead of holidays or special occasions.
- For a decorative touch, try dipping only halfway to create a two-tone effect or drizzle extra melted chocolate over the tops once set.
Nutrition
- Serving Size: 1 ball (approx. 20g)
- Calories: 110 kcal
- Sugar: 9 g
- Sodium: 60 mg
- Fat: 7 g
- Saturated Fat: 3.5 g
- Unsaturated Fat: 3 g
- Trans Fat: 0 g
- Carbohydrates: 10 g
- Fiber: 1 g
- Protein: 2 g
- Cholesterol: 10 mg
