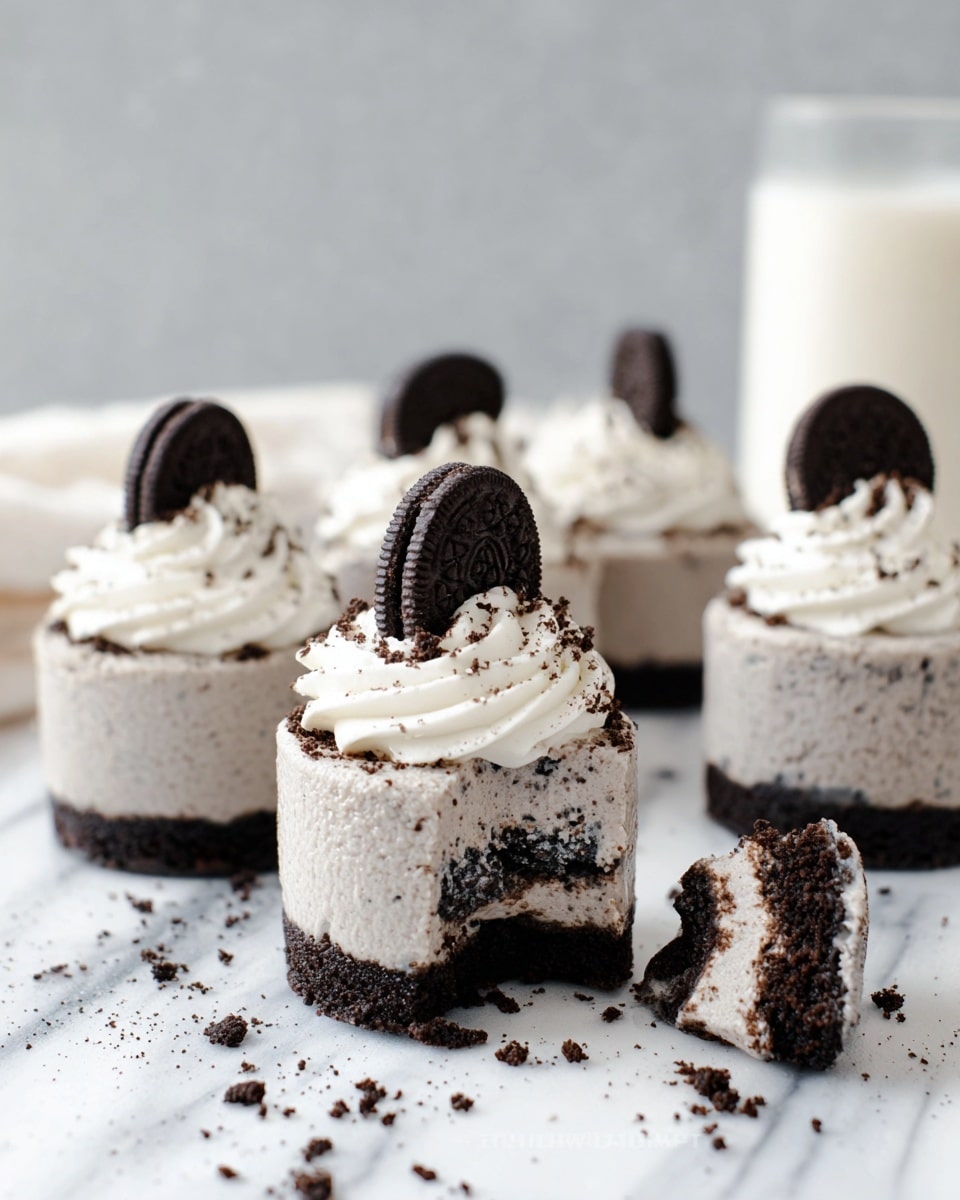
If you’re anything like me, you’ll find that there’s just something ridiculously charming about tiny desserts. That’s why this Mini No-Bake Oreo Cheesecakes Recipe quickly became a favorite in my kitchen. These little bites pack all the rich, creamy goodness of a classic cheesecake paired with the familiar, chocolatey crunch of Oreos—without ever needing to turn on your oven. Perfect for summer gatherings, last-minute parties, or just because you want a quick treat, they’re super simple to whip up and always a crowd-pleaser.
One of the things I absolutely love about this Mini No-Bake Oreo Cheesecakes Recipe is how fuss-free it is while still feeling elegant. When I first made them, I was amazed at how the dairy-free ingredients came together so seamlessly, proving that you don’t have to compromise on flavor or texture. Whether you’re dairy-free, vegan, or just curious about something new, these cheesecakes offer a velvety, decadent dessert that everyone will love. Plus, you can keep them prepped ahead of time, making your life way easier when guests arrive!
Why You’ll Love This Recipe
- No Oven Required: Perfect for hot days or when you want dessert fast without heating the kitchen.
- Dairy-Free Delight: Made with plant-based ingredients that still deliver creamy, dreamy texture.
- Portion-Friendly: Mini sizes mean you can enjoy a sweet treat without overdoing it.
- Customizable Toppings: You can easily swap out Oreo crumbles or add your favorite garnishes for a personal touch.

Ingredients You’ll Need
This Mini No-Bake Oreo Cheesecakes Recipe calls for a handful of simple ingredients that work really well together to make something special. I always recommend using a good-quality dairy-free cream cheese because it really impacts the cheesecake’s creaminess and flavor.
- Oreo Cookies: The classic cookie for the crust and filling; crushing them fresh gives a lovely texture.
- Dairy-Free Butter / Margarine: Helps bind the crust together; melts quickly and adds richness without dairy.
- Dairy-Free Whipping Cream: Look for plant-based double cream alternatives like Elmlea’s—essential for that fluffy texture.
- Dairy-Free Cream Cheese: I love Violife Original or Sainsbury’s Free From Soft Cream Cheese; both are smooth and flavorful.
Variations
I like to experiment with this Mini No-Bake Oreo Cheesecakes Recipe depending on the occasion—there are so many ways to make it your own! You can tweak the toppings or even the type of cookies used to create new flavor profiles that keep everyone interested.
- Fruit Twist: Adding fresh raspberries or strawberries on top creates a beautiful color contrast and a touch of tartness that balances the richness perfectly.
- Mint Oreo Variation: I’ve tried swapping classic Oreos for mint-flavored ones, and my family went crazy for that refreshing hint!
- Nutty Addition: Chopped pistachios or toasted almonds sprinkled on top add a wonderful crunch and elegance.
- Vegan Version: This recipe is already dairy-free, but make sure your cream cheese and whipping cream alternatives suit vegan diets for peace of mind.
How to Make Mini No-Bake Oreo Cheesecakes Recipe
Step 1: Build the Perfect Oreo Crust
Start by melting your dairy-free butter or margarine on low heat in a small saucepan—be patient here because you want it fully melted but not browned. While that’s warming up, blitz the Oreo cookies in a food processor until they become fine crumbs. Combine the melted butter with the cookie crumbs in a bowl and stir until it feels like damp sand. This texture is crucial—when you press it between your fingers, it should hold together. Press the mixture firmly into your mini cookie cup tins, compacting as much as possible to avoid crumbling later. Pop the tins in the freezer while you move on to the filling.
Step 2: Whip Up the Creamy Filling
In a medium bowl, add your dairy-free whipping cream and cream cheese. Use a stand mixer with a balloon whisk or a hand mixer if you prefer. Start whipping on low to avoid splashes, then crank it up to high speed and keep going until the mixture thickens into creamy perfection—usually around 5 minutes. Meanwhile, blitz 8 Oreo cookies into crumbs and fold them right into your whipped cream mixture. When combined, transfer the filling to a piping bag with a large round tip, or just snip off the corner for easier piping.
Step 3: Pipe and Chill Your Cheesecakes
Pipe the cheesecake filling evenly into each Oreo crust cup, filling them almost to the top. Use an offset spatula to smooth and level the tops. Place the cookie cups into the freezer for at least 4 hours, or until they are firm to the touch. Trust me—if they’re not firm enough, they won’t release nicely from the tins, and you’ll be left with a mess. Once set, transfer the cheesecakes to the fridge so they can defrost slightly before you add your finishing touches.
Step 4: Add the Final Whipped Cream Swirl
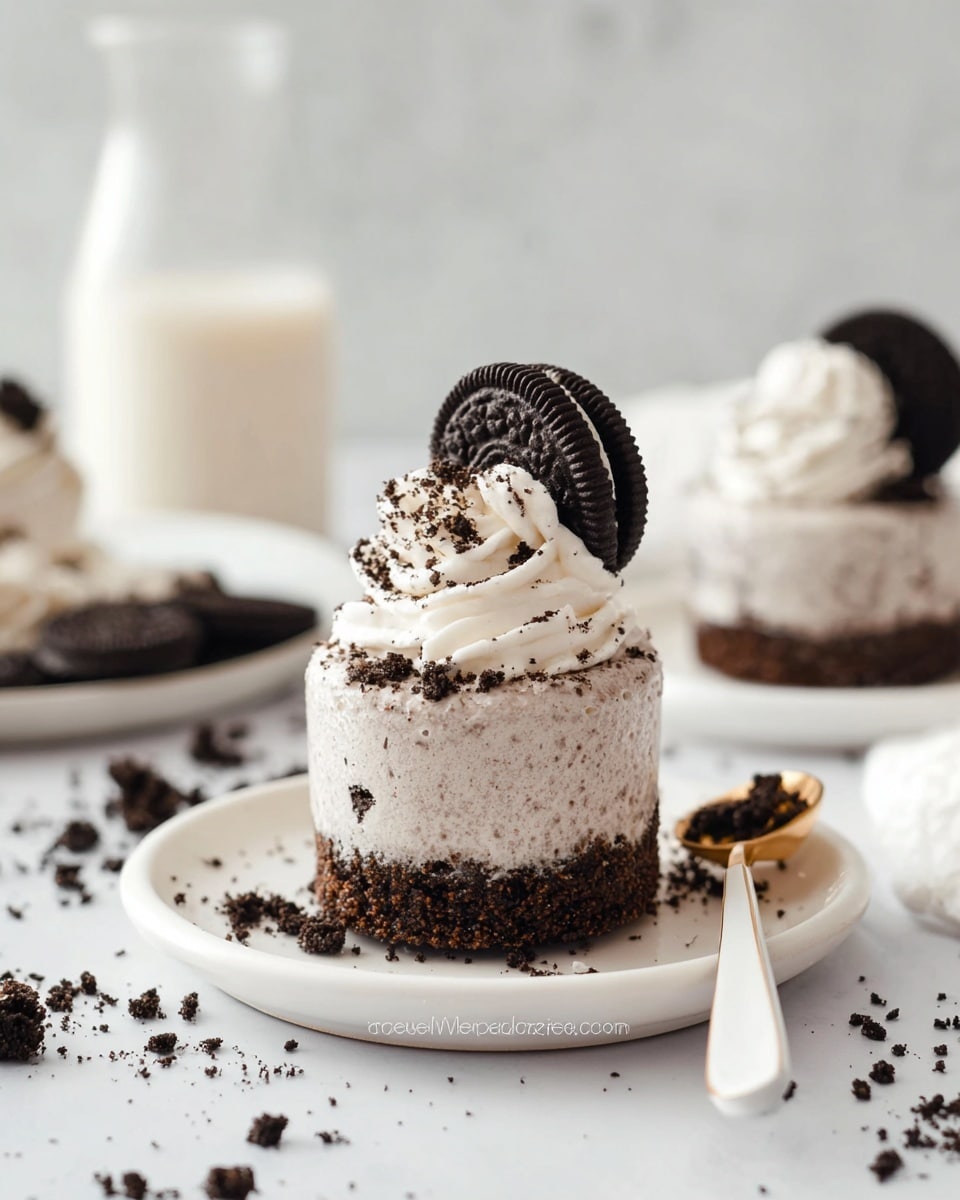
Whip up the remaining 20g of dairy-free whipping cream until thick and fluffy. Pop it into a piping bag fitted with an open star tip and decorate each mini cheesecake with a pretty swirl. Top with half an Oreo cookie and sprinkle a few crumbled Oreos over the cream for that classic finish. Serve chilled and watch how quickly they disappear—every time I serve these, someone asks for seconds (or thirds!).
Pro Tips for Making Mini No-Bake Oreo Cheesecakes Recipe
- Compact Your Crust Well: I once had my crust crumble apart because it wasn’t packed tightly enough—press firmly with clean fingers or a spoon.
- Whip Slowly at First: Starting your cream and cream cheese whip on low speed prevents splatters and helps the texture stay silky smooth.
- Freeze for at Least 4 Hours: Patience is key here! This ensures the mini cheesecakes hold their shape when removed from the tin.
- Use Piping Bags for Neatness: Piping your filling means your cheesecakes look professional and beautiful every time —totally worth the extra step!
How to Serve Mini No-Bake Oreo Cheesecakes Recipe
Garnishes
I usually finish mine with the classic half Oreo on top — it’s simple but ties the whole look together. Sometimes, especially when I’m feeling fancy, I’ll sprinkle on some chocolate shavings or dust them lightly with cocoa powder for a gentle chocolate flourish. Fresh mint leaves add a pop of color that’s pretty and refreshing, too.
Side Dishes
Since these are rich and sweet, I like pairing them with something fresh like a seasonal fruit salad or even a crisp green tea to balance the indulgence. They do well alongside a light coffee or espresso too, especially for an after-dinner treat.
Creative Ways to Present
For birthday parties or special occasions, I’ve assembled these mini cheesecakes on a tiered dessert stand lined with doilies—it instantly elevates their appearance. Another fun idea I tried was serving them in mini mason jars for an adorable, portable option that guests loved. If you want to get extra creative, drizzle some vegan chocolate sauce over the top just before serving for that wow factor!
Make Ahead and Storage
Storing Leftovers
I store any leftovers in an airtight container in the fridge, and they keep beautifully for up to 2 days. I’ve found that keeping them cool helps preserve that creamy texture without the crust getting soggy. Just be sure to cover them well to avoid absorption of fridge odors.
Freezing
I’ve successfully frozen these mini cheesecakes by placing them on a baking tray first to freeze solid before transferring to a sealed container. When you want them, thaw overnight in the fridge for best texture. Freezing is a handy way to prep desserts ahead for big events!
Reheating
Since these are chilled desserts, reheating isn’t really necessary. If you want to soften them slightly, just remove from the fridge about 10 minutes before serving. They’ll be creamy and perfect without any heat.
FAQs
-
Can I use regular cream cheese instead of dairy-free?
Absolutely! The recipe works well with traditional cream cheese if you’re not dairy-free. Just make sure to whip it thoroughly to achieve that light, fluffy cheesecake filling.
-
How do I prevent the crust from falling apart?
Press the Oreo crumb and butter mixture very firmly into the tins to help it hold together. Using your fingers or the back of a spoon to compact the mixture tightly makes a big difference.
-
Can I make these cheesecakes larger?
You can, but since the recipe is designed for mini sizes, larger cheesecakes might take longer to set and could be trickier to unmold neatly. If you want to scale up, consider using a springform pan for a classic no-bake cheesecake.
-
Is it necessary to freeze the cheesecakes?
Yes, freezing helps the cheesecakes set properly so they keep their shape when removed from the molds. Without freezing, the filling will be too soft and might collapse.
-
Can I use a hand mixer or whisk instead of a stand mixer?
Definitely! A hand mixer works great, and if you don’t have one, a strong arm and hand whisk will do just fine—just take a little extra time to get that thick, creamy texture.
Final Thoughts
This Mini No-Bake Oreo Cheesecakes Recipe holds a special place in my dessert rotation because of its ease and how much joy it brings once you dig in. The balance of smooth, creamy filling with crunchy Oreo bits is pure magic every single time. I genuinely recommend giving these a try—you don’t need fancy equipment or hours in the kitchen, just a little love and some simple ingredients. When you do, I bet your friends and family will be asking you to make these again and again, just like mine do.
Print
Mini No-Bake Oreo Cheesecakes Recipe
- Prep Time: 20 minutes
- Cook Time: 0 minutes
- Total Time: 4 hours 20 minutes
- Yield: 6 mini cheesecakes
- Category: Dessert
- Method: No-Cook
- Cuisine: American
- Diet: Vegan
Description
These Mini No-Bake Oreo Cheesecakes are a delicious and easy-to-make vegan treat featuring a crunchy Oreo base and creamy dairy-free cheesecake filling topped with whipped cream and Oreo decorations. Perfect for those looking for a dairy-free dessert option that requires no baking.
Ingredients
Base Ingredients
- 150g Oreo Cookies
- 50g dairy-free butter or margarine
Cheesecake Filling Ingredients
- 260g dairy-free whipping cream (e.g., Elmlea Plant Based Alternative Double cream)
- 160g dairy-free cream cheese (such as Violife Original Cream Cheese or Sainsbury’s Free From Soft Cream Cheese)
- 8 Oreo Cookies
Whipped Cream Topping
- 20g dairy-free whipping cream
- 4 Oreo Cookies (for decoration)
Instructions
- Prepare the base: Melt 50g dairy-free butter or margarine in a small saucepan over low heat. Transfer the melted butter to a heatproof bowl. Blitz 150g Oreo cookies in a blender or food processor until fine crumbs form. Mix the crumbs into the melted butter until it resembles wet sand that holds shape when pressed. Press this mixture firmly into each cookie cup mold, compacting well to prevent crumbling. Place the molds into the freezer to chill while preparing the filling.
- Make the cheesecake filling: In a medium bowl, add 260g dairy-free whipping cream and 160g dairy-free cream cheese. Whip at low speed initially to avoid splashing, then increase to high speed and whip until thick and creamy, about 5 minutes. Meanwhile, finely grind 8 Oreo cookies in a blender. Fold the crushed cookies into the whipped cream and cream cheese mixture until well combined.
- Assemble the cheesecakes: Transfer the cheesecake filling into a piping bag fitted with a large round tip. Pipe the filling evenly into each cookie cup, smoothing the tops with an offset spatula. Freeze the assembled cheesecakes for at least 4 hours or until firm to the touch.
- Prepare the whipped cream topping: Once the cheesecakes have set, slightly defrost them in the fridge. Whip 20g dairy-free whipping cream on high speed until thick and fluffy. Transfer the cream to a piping bag fitted with an open star tip.
- Decorate and serve: Pipe a swirl of whipped cream on top of each cheesecake. Garnish each with half an Oreo cookie and some crushed cookie crumbs. Serve chilled and enjoy!
Notes
- To store: Keep the mini cheesecakes refrigerated and best enjoyed within 2 days of making.
- Dairy-free cream cheese recommendations: Violife Original Cream Cheese and Sainsbury’s Free From Soft Cream Cheese are vegan-friendly options.
- Ensure the Oreo base is compacted well to prevent crumbling when unmolding.
- If using push-up cookie cup tins, gently push up the base to release the cheesecakes after freezing.
Nutrition
- Serving Size: 1 mini cheesecake
- Calories: 280
- Sugar: 18g
- Sodium: 120mg
- Fat: 18g
- Saturated Fat: 6g
- Unsaturated Fat: 10g
- Trans Fat: 0g
- Carbohydrates: 28g
- Fiber: 1.5g
- Protein: 3g
- Cholesterol: 0mg
