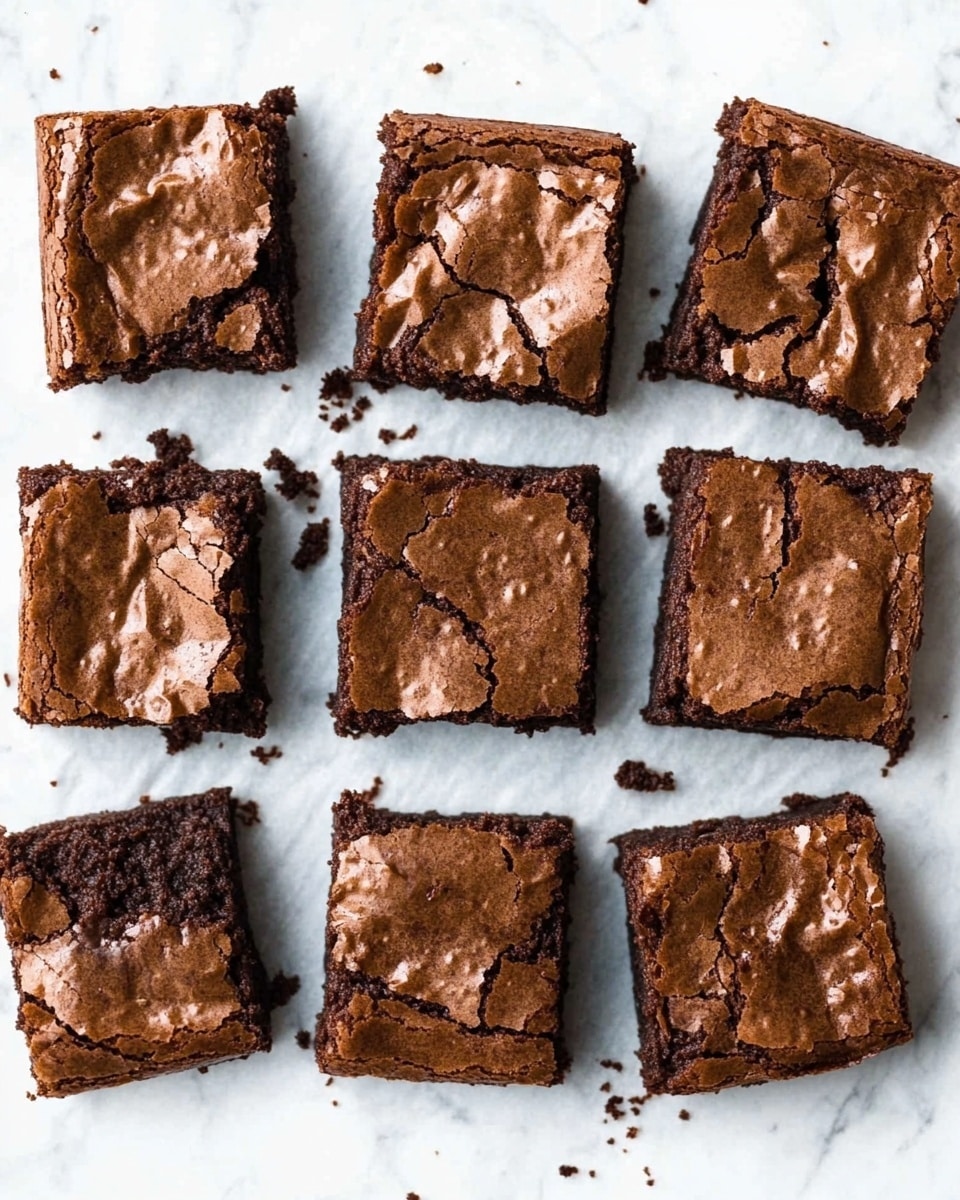
If you’re a chocolate lover, you’re going to adore this Seriously Fudgy Homemade Brownies Recipe. I absolutely love how dense and rich these brownies get without that cakey texture some recipes force on you. They’re perfect when you want a dessert that feels indulgent and satisfying without any fuss—just simple ingredients coming together to create magic.
When I first tried this Seriously Fudgy Homemade Brownies Recipe, I was amazed at how the combination of melted butter and chopped chocolate gave it that ultra-fudgy center, while the bit of cocoa powder added a deep chocolate flavor that makes you want to keep nibbling. Whether you’re bringing them to a party, craving a midweek treat, or baking with kids, these brownies never disappoint and are a real crowd-pleaser.
Why You’ll Love This Recipe
- Unmatched Fudginess: The melted chocolate and butter combo creates an ultra-rich, gooey center that’s simply irresistible.
- Simple Ingredients: Uses pantry staples you probably already have, making it low-stress and convenient.
- Adjustable Sweetness: You can easily tweak the sugar for your preferred level of sweetness without sacrificing texture.
- Crowd-Pleaser: Whether it’s for a family dessert or a potluck, these brownies consistently get rave reviews every time.

Ingredients You’ll Need
Each ingredient in this Seriously Fudgy Homemade Brownies Recipe has its role in building that melt-in-your-mouth texture and deep chocolate flavor. Here’s why I choose each—and some tips on picking the best versions for your kitchen.
- Unsalted butter: Real butter adds richness and moisture; unsalted lets you control the salt level for balance.
- Semi-sweet chocolate bar: I prefer chopping up a good-quality bar (like Ghirardelli or Lindt) to get those melty pockets in the brownies.
- Granulated sugar: Straightforward sweetness that helps give the brownies structure and that classic texture.
- Large eggs: Using room temperature eggs makes mixing easier and helps the batter come together smoothly.
- Pure vanilla extract: Enhances the chocolate flavor and adds a whisper of warm aroma.
- Unsweetened natural or dutch-process cocoa powder: Dutch-process is my go-to for a smoother, deeper chocolate punch.
- All-purpose flour: I use spooned and leveled measurements to keep the brownies tender but not cakey.
- Salt: Just a little brings out the chocolate flavor and balances sweetness.
- Optional semi-sweet chocolate chips: For extra gooey pockets if you love an intensified chocolate burst.
Variations
I’m all about making recipes your own, especially a crowd-pleaser like this Seriously Fudgy Homemade Brownies Recipe. I’ve tried a few fun twists over the years, and you can easily swap or add ingredients to suit your mood or dietary needs.
- Nutty Variation: Adding a cup of chopped walnuts or pecans brings a lovely crunch contrast; my family goes crazy for this combo.
- Fudgy with Espresso: A teaspoon of espresso powder enhances the chocolate’s depth without tasting like coffee — a delightful secret hack I discovered!
- Gluten-Free Option: Swap all-purpose flour for a gluten-free blend I trust, and you’ll get chewy, fudgy brownies without losing texture.
- Swirled Cheesecake: Dollop a cream cheese mixture on top and swirl it through the batter before baking for a rich, tangy twist I tried recently.
How to Make Seriously Fudgy Homemade Brownies Recipe
Step 1: Prep Your Pan for Easy Brownie Removal
Start by preheating your oven to 350°F (177°C). Grease a 9×13-inch pan lightly, but here’s a trick I use: line it with parchment paper or foil and leave an overhang on the sides. This makes lifting the brownies out a breeze, so you avoid crumbly edges when cutting. Trust me, this saved me tons of frustration in the past!
Step 2: Melt Butter and Chocolate to Create the Fudgy Base
In a microwave-safe bowl, combine your butter with half the chopped semi-sweet chocolate. Microwave in 30-second bursts, whisking between each, until silky smooth. Taking it slow here prevents the chocolate from seizing up. This luscious mixture is the heart of your fudgy brownies.
Step 3: Mix in Sugar, Eggs, and Vanilla
Next, whisk in the sugar until fully incorporated; it might look a bit grainy at first, but keep going. Then add the eggs one by one, whisking thoroughly after each addition. The batter will lighten in color and thicken slightly — that’s the sign you’re on the right track. Finally, stir in your vanilla extract for that subtle boost.
Step 4: Fold in Your Dry Ingredients and Remaining Chocolate
Now add the cocoa powder, flour, and salt. Fold everything together gently with a silicone spatula or wooden spoon until combined — you don’t want to overmix or you’ll lose fudginess. Stir in the remaining chopped chocolate and chocolate chips for those melty pockets throughout. The batter will be thick and rich; that’s exactly what you want!
Step 5: Bake and Test for Perfect Gooeyness
Spread your batter evenly in the prepared pan and pop it into the oven. Set your timer for 30 minutes but don’t rely solely on it: flake test by inserting a toothpick into the center. If it comes out with wet batter, give it a couple more minutes. When you see just a few moist crumbs clinging, you’ve hit fudgy perfection. It usually takes me around 31–32 minutes, but ovens vary—so keep a close eye!
Step 6: Cool Completely Before Cutting
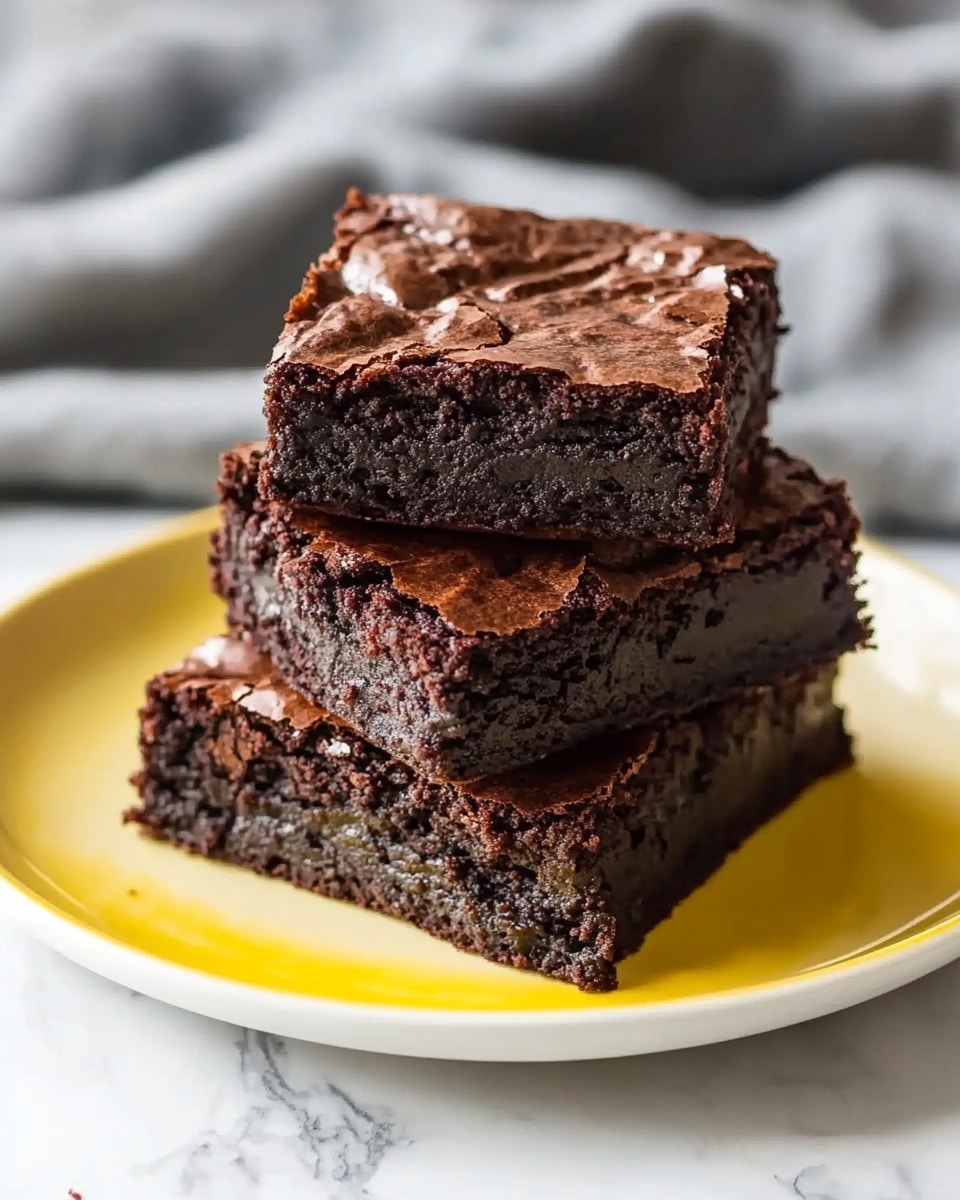
Once out of the oven, transfer your pan to a wire rack and let the brownies cool fully before slicing. This waiting game allows the brownies to set, giving you neat squares instead of a gooey mess. I know it’s tempting to dig in immediately (been there!), but patience pays off with perfect cuts.
Pro Tips for Making Seriously Fudgy Homemade Brownies Recipe
- Use Quality Chocolate: I found using a good semi-sweet bar makes a huge difference in flavor and texture—don’t skimp here!
- Don’t Overmix: Folding the dry ingredients gently keeps the brownies dense and fudgy rather than cakey.
- Watch the Bake Time Closely: Ovens vary, so test your brownies a minute or two before the timer goes off to avoid drying them out.
- Let Them Cool Fully: Cutting too soon leads to crumbly brownies, so I always wait at least one hour, or overnight if I can.
How to Serve Seriously Fudgy Homemade Brownies Recipe
Garnishes
When I serve these brownies, I love sprinkling a pinch of flaky sea salt over the top right after baking—it enhances the chocolate and balances sweetness beautifully. Sometimes I dust them lightly with powdered sugar for a pretty, cafe-style look. If I’m feeling indulgent, a scoop of vanilla ice cream on the side transforms them into an instant dessert winner.
Side Dishes
This recipe is rich enough to stand on its own, but pairing it with a fresh berry salad or a dollop of whipped cream adds freshness that cuts through the richness. For a cozy night in, a hot espresso or a glass of cold milk always hits the spot alongside these brownies.
Creative Ways to Present
For birthday parties or holiday gatherings, I like cutting the brownies into small bite-sized squares and stacking them into a pyramid on a pretty plate, sometimes drizzling melted chocolate on top. Another fun idea I tried was sandwiching a layer of peanut butter or marshmallow fluff between two brownie squares for a decadent treat.
Make Ahead and Storage
Storing Leftovers
I store leftover brownies in an airtight container at room temperature—this keeps them moist and fudgy for up to a week. If you live in a warm climate, I recommend popping them in the fridge, but be sure to bring them back to room temperature before serving for the best texture.
Freezing
These brownies freeze wonderfully! I wrap them tightly in plastic wrap and place them in a freezer bag or container for up to three months. When I want a treat, I just thaw them overnight in the fridge and let them come to room temp before enjoying.
Reheating
If you want to warm up a brownie slice, I zap it in the microwave for about 10-15 seconds to melt that chocolatey center—just be careful not to overdo it or it might dry out. Alternatively, a quick 5 minutes in a low oven works great if you’re reheating multiple pieces.
FAQs
-
Can I substitute butter with oil in this Seriously Fudgy Homemade Brownies Recipe?
You can, but I recommend sticking with butter if possible because it adds flavor and contributes to the fudgy texture. Oil might make the brownies moist but changes the flavor profile and can make the texture slightly different—less rich in my experience.
-
How do I know when the brownies are perfectly baked?
Look for moist crumbs on your toothpick test—not wet batter—when inserted into the center. The edges will look set, but the center should still seem slightly soft. This indicates that irresistible fudgy texture inside.
-
Can I use cocoa powder instead of chopped chocolate?
Cocoa powder delivers flavor, but the chopped chocolate creates pockets of gooey texture and richness that cocoa alone can’t replicate. For best results in this recipe, use both.
-
Is it better to use natural or dutch-process cocoa powder?
Both work here, but I prefer dutch-process for a smoother, more mellow chocolate flavor. Natural cocoa has a brighter, more acidic note, which some people also enjoy—feel free to experiment!
-
Can I halve this recipe for a smaller batch?
Absolutely! Just adjust your pan size accordingly and keep a close eye on baking time—smaller batches may bake faster. I recommend checking with a toothpick around 20–25 minutes.
Final Thoughts
This Seriously Fudgy Homemade Brownies Recipe has become my go-to for any occasion when I want a classic chocolate fix that feels homemade but still impressive. I love sharing these with friends because they always ask for the recipe—and I know you’ll feel confident making them too, with all these tips and tricks in hand. Give it a try; once you have one bite, you’ll see why these brownies stand out as an all-time favorite in my kitchen!
Print
Seriously Fudgy Homemade Brownies Recipe
- Prep Time: 10 minutes
- Cook Time: 30 minutes
- Total Time: 3 hours
- Yield: 18 large brownies
- Category: Dessert
- Method: Baking
- Cuisine: American
Description
These Seriously Fudgy Homemade Brownies deliver rich, chocolatey indulgence with a dense, moist texture. Made from scratch using high-quality cocoa powder and semi-sweet chocolate, this easy recipe yields deeply fudgy brownies perfect for any chocolate lover. The batter comes together quickly, baking into a decadent treat that stays fresh for up to a week on the counter or even longer when frozen.
Ingredients
Chocolate Mixture
- 3/4 cup (12 Tbsp; 170g) unsalted butter
- 4–ounce (113g) semi-sweet chocolate bar, coarsely chopped and divided*
Wet Ingredients
- 2 cups (400g) granulated sugar*
- 3 large eggs, at room temperature
- 2 teaspoons pure vanilla extract
Dry Ingredients
- 1 cup (82g) unsweetened natural or dutch-process cocoa powder*
- 1 cup (125g) all-purpose flour (spooned & leveled)
- 1 teaspoon salt
Optional Mix-ins
- 1 and 1/4 cups (225g) semi-sweet chocolate chips
Instructions
- Prepare the Pan: Preheat your oven to 350°F (177°C). Grease a 9×13-inch baking pan or line it with aluminum foil or parchment paper, leaving an overhang on the sides to easily lift out the baked brownies for clean cutting later. Set aside.
- Melt Butter and Chocolate: In a microwave-safe bowl, combine the butter and half (2 ounces/57g) of the chopped semi-sweet chocolate. Microwave in 30-second increments, whisking after each, until the mixture is completely smooth without lumps.
- Incorporate Sugar and Eggs: Whisk the granulated sugar into the melted butter and chocolate mixture until fully combined. Then add the eggs and vanilla extract, whisking thoroughly. The batter will appear light brown and slightly dull in color.
- Add Dry Ingredients and Remaining Chocolate: Sift in the cocoa powder, all-purpose flour, and salt. Add the remaining 2 ounces (57g) of chopped chocolate along with the optional chocolate chips. Fold all ingredients gently using a silicone spatula or wooden spoon until a thick, fudgy batter forms.
- Spread Batter and Bake: Evenly spread the thick batter into the prepared pan. Place it in the preheated oven and bake for about 30 minutes. Begin testing for doneness by inserting a toothpick into the center—if it comes out with wet batter, continue baking and check every 2 minutes. The brownies are done when the toothpick shows only a few moist crumbs, typically around 31-32 minutes.
- Cool and Serve: Remove the brownies from the oven and cool completely on a wire rack while still in the pan. Once cooled, use the foil or parchment overhang to lift the entire slab from the pan and cut into 18 large squares.
- Storage: Store leftover brownies covered at room temperature for up to one week or freeze for up to three months (thaw in the refrigerator overnight before serving).
Notes
- Make Ahead: Brownies freeze well for up to 3 months. Thaw overnight in the fridge and bring to room temperature before serving for best texture.
- Special Tools: Use a 9×13-inch metal or glass baking pan for best results, plus a whisk, silicone spatula or wooden spoon, and wire cooling rack.
- Chocolate Bars: Use good-quality semi-sweet chocolate bars sold in 4-ounce portions; 2 ounces are melted and 2 ounces chopped to fold into the batter. Recommended brands include Ghirardelli, Baker’s, or Lindt.
- Sugar Variations: Try substituting 1/2 cup (100g) light brown sugar with 1 1/2 cups (300g) granulated sugar for a slightly richer taste.
- Cocoa Powder: Natural or dutch-process cocoa powder can be used; dutch-process provides a smoother flavor preferred by many.
Nutrition
- Serving Size: 1 large brownie (approx. 1/18th of recipe)
- Calories: 310
- Sugar: 32g
- Sodium: 170mg
- Fat: 18g
- Saturated Fat: 11g
- Unsaturated Fat: 6g
- Trans Fat: 0g
- Carbohydrates: 38g
- Fiber: 3g
- Protein: 4g
- Cholesterol: 70mg


